The microstructure and Cu content of different parts of squeeze casting parts are studied, and the influence of wall thickness on the microstructure and Cu content of the sample is discussed. The optical microscope and direct reading spectrometer are used to observe and measure the microstructure changes and solutes of each part of the part. Content changes. The results show that as the distance between the sample and the inner gate (158, 201, 245, 284 mm) increases in sequence, the crystal grains of the sample become coarser, and the crystal grain size changes from 18.35 μm to 39.85 μm. The Cu content increased from 1.73%~1.77% on the surface to 1.81%~1.87% on the core, and the hardness (HV) decreased from 102.5~106 on the surface to 96~99 on the core; the greater the wall thickness (6, 17, 27.5 mm), the smaller the hardness value of the core, the minimum is 96HV, the grains become coarser, the grain size is 45.22 μm, and the copper content in the core increases; from the surface of the sample to the core, the copper content shows an increasing trend. From 1.73%~1.75 on the surface to 1.83%~1.85% on the core, the hardness shows a decreasing trend.
Extrusion castings have excellent mechanical properties, finer grain size and more uniform microstructure. In the squeeze casting process, the solid-liquid zone undergoes forced feeding under the action of the squeezing force, thereby eliminating the casting defects such as shrinkage cavity, shrinkage porosity, and porosity inside the casting, and increasing the supercooling of the molten metal Degree and the heat transfer coefficient of the contact interface with the mold to obtain a fine and dense casting structure, thereby improving the quality and mechanical properties of the casting. Because the molten metal is chilled by the mold wall during the filling process, it solidifies first on the surface of the mold to form a thin chilled layer. During the filling process, the chilled layer is subjected to the squeezing force to produce plasticity. Deformation causes the squeezing force to gradually decrease starting from the inner gate, and the change of the squeezing force and the wall thickness of different parts of the part are different, resulting in different tissues and solute content in different parts of the part. At present, there are many research reports on the influence of squeeze casting process parameters on the structure and solute content of parts, but there are few reports on the influence of different parts and wall thickness on the same part on the structure and solute content and performance of different parts of the casting. Therefore, the research on extrusion The structure and solute distribution at different positions and wall thicknesses of the cast load-bearing parts have positive significance for the composition design and performance evaluation of squeeze castings, so as to give full play to the potential of the material.
1Test materials and methods
Select ADC12 aluminum alloy, melt ADC12 in KGPS160/500 intermediate frequency induction furnace, melting temperature is 750±20 ℃, pouring at 680±20 ℃, using SCH-350 squeeze casting machine for squeeze casting, using M5000 straight The chemical composition measured by the spectrometer is shown in Table 1. The obtained squeeze casting parts are shown in Figure 1. Select site 1, site 2, site 3, and site 4 as the research objects of the tissue and solute content of different sites. The distance from the inner gate is shown in Table 2. The part 2 with a wall thickness of 17 mm, the part 5 with a wall thickness of 6 mm, and the part 6 with a wall thickness of 27.5 mm were selected as the research objects of the influence of the wall thickness on the tissue and solute distribution.
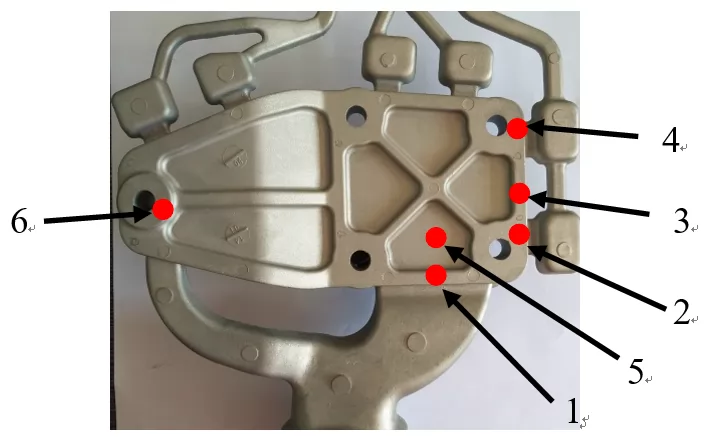
Figure 1 Schematic diagram of parts and sampling locations
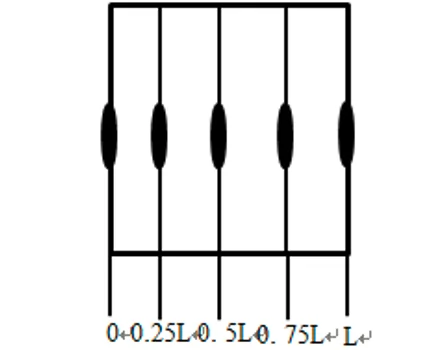
Figure 2 Schematic diagram of the preparation method of metallographic and component samples

Table 1 The chemical composition of ADC12 alloy wb/%

Table 2 Distance between sampling location and gate
According to Figure 2, cut the sample parallel to the surface, and select 5 areas on each sample. The distance from the surface of the fixed mold of the sample is r=0, 0.25L, 0.5L, 0.75L, L, and L is the whole The thickness of the sample, the sample is polished and polished, and the volume fraction is 1.5% HF corrosion for 10 s. The microstructure of the sample is observed with the OLYMPUS-GX71-6230A metallurgical microscope, and the direct reading spectrum analysis is performed to determine The distribution of Cu content from the core to the surface of each sample, and plot the copper content curves of different parts and different wall thicknesses, and then use the HVS-50 Vickers hardness tester to measure the hardness change of each sample from the core to the surface. The hardness value is determined by the 5-point average method, and the hardness curves of different parts and different wall thicknesses are drawn.
2 Test results and analysis
2.1 Microstructure and Cu content of different parts
2.1.1 Microstructure of different parts
Figure 3 shows the microstructure of the core of the sample at different locations. It can be seen that the structure is composed of white α-Al phase and black eutectic Si phase. As the distance to the inner gate increases, the grains of the sample become coarser. After the molten metal fills the cavity, it solidifies under pressure, and the first contact part with the mold solidifies first, but the pressure still acts on the casting. Unlike the direct squeeze casting process, only a small amount of plastic deformation occurs on the surface of the casting at this time. Because the pre-solidified structure hinders the transmission of pressure and causes the loss of extrusion force, that is, the extrusion force on each part of the part is different, and as the distance to the inner runner increases, the extrusion force gradually decreases. It can be seen from Figure 1 that sample 1 is closest to the gate, so the extrusion force acting on sample 1 is the largest, followed by sample 2, sample 3, and sample 4. The distribution law of its grain size is also Sample 1 is the smallest, followed by sample 2, sample 3, and sample 4 in descending order. The grain size has increased from 18.35 μm for sample 1 to 39.85 μm for sample 4.
The temperature of the mold at each point was measured with an infrared temperature thermometer, and the results are shown in Table 3. The results show that the temperature of each point is basically the same, so it can be assumed that the molten metal is solidified under the same external conditions.

Table 3 Mold temperature at each sampling position
Studies have shown that changing the extrusion force on the alloy will cause a change in its equilibrium crystallization temperature, and the relationship is as follows:

Can be written approximately as

In the formula, P is the extrusion force; VS and VL are the volumes of liquid and solid phases per unit mass; Tf is the equilibrium temperature when P=1.1MPa.
The volume shrinkage of ADC12 alloy during solidification, that is, VS-VL<0, can be seen from formula (2) that when the distance from the gate decreases, the extrusion force increases, which increases the alloy's equilibrium temperature. Under squeeze casting, the liquidus temperature of the alloy rises due to the squeezing force, which increases the degree of supercooling of the alloy.
The critical nucleus radius rk and critical nucleation work during molten metal solidification are:

In the formula, Lm is the latent heat of fusion; is the density; is the surface tension; is the degree of subcooling.
It can be seen from formulas (3) and (4) that increasing the degree of subcooling can reduce the critical nucleus radius and critical nucleation work, thereby causing an increase in the number of crystalline cores. The greater the number of crystalline cores, the finer the crystal grains.
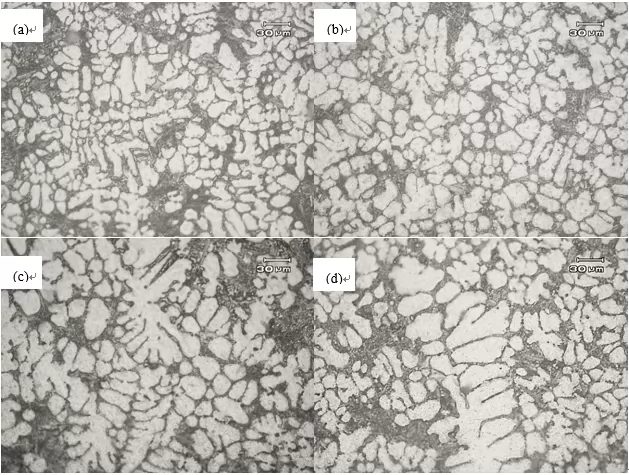
Figure 3 Microstructure of different parts
2.1.2 Cu content in different parts
Figure 4 is the Cu content variation curve from the surface to the core of the different parts of the sample. It can be seen that from the surface of the casting to the core, the Cu content is increasing, from 1.73% to 1.77% on the surface to 1.81% to 1.87% in the core. This is because ADC12 alloy is a near-eutectic alloy with a narrow crystallization temperature range, solidification equilibrium distribution coefficient k0<1, and the solidification method is characterized by layered solidification. During the squeeze casting process, the molten metal solidifies and crystallizes from the outside to the inside. A dendrite framework is formed. The freezing point of the Al2Cu phase is lower than that of the eutectic phase and the α phase. The solid phase area on the outside of the casting undergoes slight plastic deformation under the action of the extrusion force. The crystal channel is forced to the inside of the casting.
Research by Hu Hanqi et al. showed that the formula for the distribution of solute in the dendrites of the casting surface is:

In the formula,, is the solidification shrinkage rate of the alloy; u is the solidification rate; V is the flow rate of the molten metal; is the cooling rate; T is the temperature gradient.
Therefore, the average concentration of solute in a certain area can be expressed as:

The simplified formula (6) is:

In a certain local area, according to the weighting formula:

In the formula, is the solid mass fraction; is the liquid mass fraction. According to formula (8), the content of solute elements in the liquid surrounding the solid can be calculated as:

From equation (5), it can be seen that the content of solute elements in the region is determined by the equilibrium solidification coefficient of ADC12 aluminum alloy k0<1, so as the value of q increases, C(-)S decreases. The mold surface temperature is low, resulting in an increase in the cooling rate, so that q increases and C(-)S also decreases. It can be seen from formula (7) that C(-)S decreases and C(-)L increases, that is, the solute content in the liquid phase is higher than that in the solid phase, so the metal is squeezed toward the center along the dendrite channel The high liquid solute content results in high copper content in the core and low copper content on the surface.
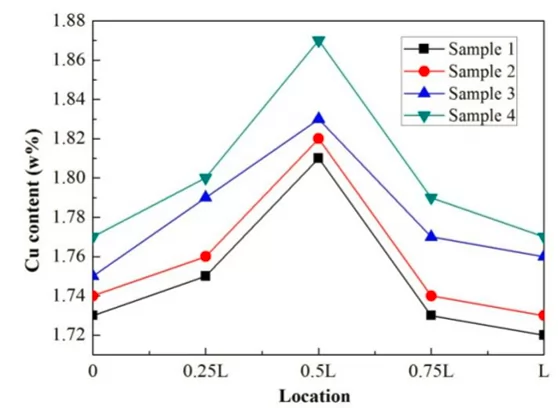
Figure 4 shows the Cu content from the surface to the inside of ADC aluminum alloy extrusions. It can be seen that as the distance from the inner gate increases, the copper content in the core of sample 1 to sample 4 gradually decreases from 1.87% to 1.81%. During the part filling and solidification process, because the molten metal solidifies and crystallizes from the outside to the inside to form a dendrite framework, the solid phase area on the outside of the casting undergoes plastic deformation under the action of the extrusion force, which leads to extrusion during the filling process There is a loss of force, that is, the squeezing force on each part of the part is different, and as the distance to the inner gate increases, the squeezing force gradually decreases. According to Darcy's law, the flow velocity V of liquid metal between dendrites has a linear relationship with the pressure gradient, and the relationship is:

In the formula, K is the permeability coefficient, K=VfL2, which depends on the size of the dendrite gap, where V is a constant related to the dendrite gap and structure; fL is the volume percentage of the liquid phase; Z is the viscosity coefficient of the liquid phase; P Is the pressure gradient in the three-dimensional space; g is the acceleration due to gravity, and dL is the density of the liquid.
When considering the one-dimensional flow and the homogeneity of the liquid, equation (10) becomes:

Obviously the metal flow rate is related to the dynamic viscosity coefficient, the liquid phase volume fraction and the pressure gradient. During the squeeze casting process, the squeeze force P is much greater than the negative pressure caused by solidification shrinkage. It can be seen from equation (11) that the greater the applied pressure , The liquid flow rate between dendrites will increase, and the Cu content in the core of the casting will increase.
different parts
Figure 5 shows the change curve of the hardness of different parts of the sample from the surface to the core. It can be seen that the hardness value shows a decreasing trend from the surface of the sample to the core. The hardness (HV) has changed from 102.5~106 on the surface to 96~99 in the heart. Since the surface of the casting is in contact with the mold wall, the cooling rate increases, and the time required to complete the crystallization is short. The solute redistribution plays a small role and improves the hardness of the alloy. The dendrites formed in the core are relatively coarse, so the core The positional hardness is relatively low.
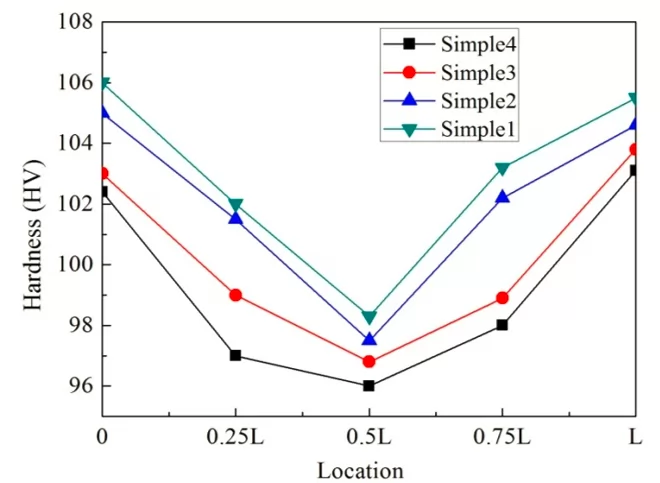
Figure 5 Hardness values at different positions of the sample
It can be seen from Figure 5 that the hardness value of sample 1 to sample 4 increases as the distance to the inner runner increases. As the distance to the inner runner increases, the squeezing force decreases, and the degree of supercooling of the molten metal is also reduced, resulting in a decrease in the cooling rate of the molten metal, and an increase in shrinkage defects formed in the center of the solidification process of the molten metal. Therefore, the core hardness of the alloy is reduced.
2.2 The influence of wall thickness on structure and Cu content
2.2.1 The influence of wall thickness on microstructure
Figure 6 shows the heart microstructure of samples with different wall thicknesses. It can be seen that the grains of sample 5 are the smallest, and the grains of thick-walled sample 6 are relatively coarse. According to calculations, as the wall thickness increases, the grain sizes are 18.25 μm, 27.38 μm, and 45.22 μm, respectively. The distance between sample 2, sample 5 and sample 6 from the runner is 201 mm, so during the filling process, the pressing force to reach these 3 positions is the same, and the wall thickness is 27.5 mm in turn (sample 6) , 17 mm (sample 2), 6 mm (sample 5), the thin-walled sample contains less molten metal, and the cooling rate is fast during the solidification process, which leads to an increase in the degree of subcooling, according to formula (3) and According to the analysis of formula (4), increasing the degree of subcooling can reduce the critical nucleus radius and critical nucleation work, thereby causing an increase in the number of crystalline cores. The greater the number of crystalline cores, the finer the crystal grains, so the crystal of sample 5 The particles are the smallest.
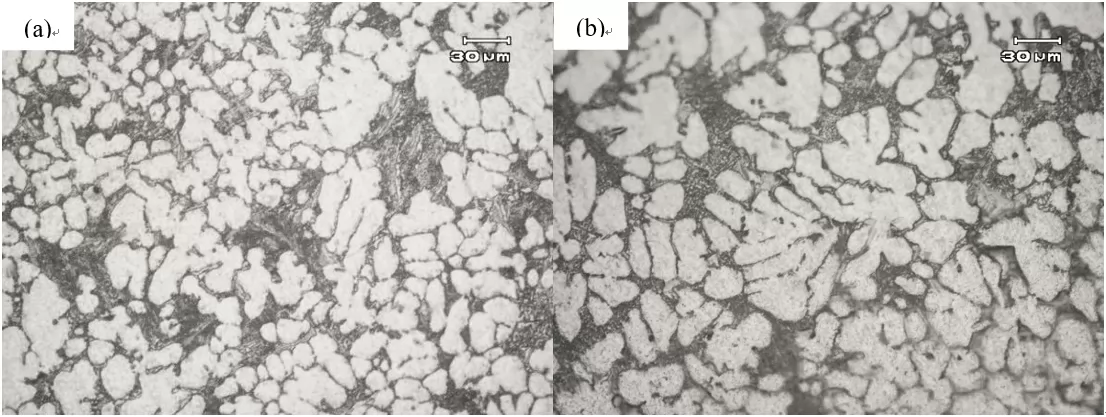
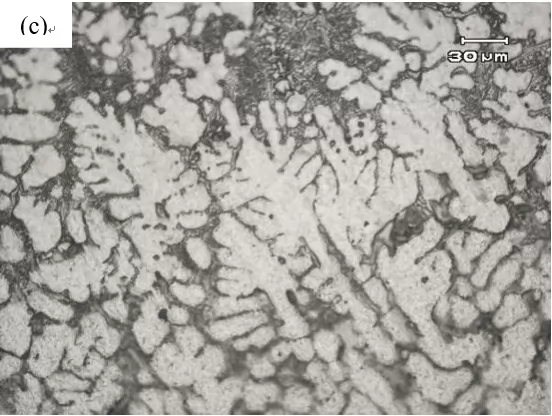
Figure 6 Microstructure of samples with different wall thicknesses
2.2.2 The influence of wall thickness on Cu content
Figure 7 shows the copper content from the surface to the core of the samples with different wall thicknesses. It can be seen that from the surface of the sample to the core, the copper content is increasing, from 1.73% to 1.75 on the surface to 1.83% to 1.85% in the core. The heart of sample 1, sample 5 and sample 6 The copper content is 1.85%, 1.84% and 1.83% respectively. It can be seen from formula (9) that the solute content in the molten metal is high. Under the action of the squeezing force, the Cu-rich molten metal is forcibly squeezed into the core of the sample, resulting in a higher Cu content in the core than on both sides.
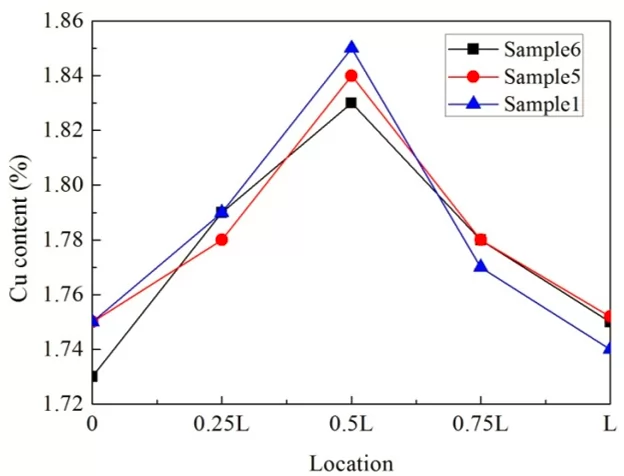
Figure 7 Cu content in different positions of samples with different wall thicknesses
It can be seen from Figure 7 that as the wall thickness increases, the core copper content of the sample also increases. The thickness of the wall determines the cooling rate of the alloy liquid. The thin-walled sample cools fast. According to the relationship of the permeability coefficient, the cooling rate is fast, the dendrite gap is small, the permeability coefficient is also small, and the flow rate of the molten metal is also Small, so that less Cu-rich molten metal flows to the core, so the core of the thick-walled sample has a high copper content.
2.2.3 The influence of wall thickness on sample hardness
Figure 8 shows the hardness changes at different positions of the sample. It can be seen that from the surface of the sample to the core, the hardness value (HV) decreases, from 103.75 to 106 on the surface to 97 to 100.5 in the core. This is because ADC12 is characterized by layered solidification. Because the surface of the casting is in contact with the mold wall, the cooling rate increases, the time required to complete the crystallization is short, and there are few shrinkage holes formed, and the core solidifies at the end, which is easy to form shrinkage. Defects such as looseness reduce the hardness of the alloy core.
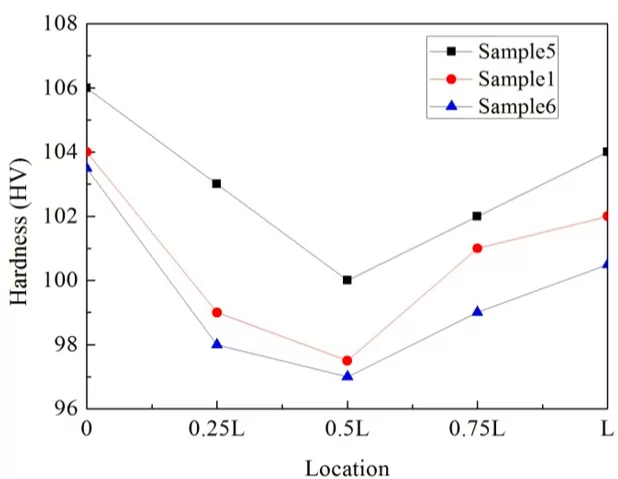
Figure 8 The hardness of different positions of the sample
It can be seen from Figure 8 that as the wall thickness increases, the hardness of the sample decreases, and sample 6 has the lowest hardness, which is 97HV. This is because the sample wall is thin, the cooling rate of the molten metal is fast, and the temperature gradient in the alloy liquid in front of the solid-liquid interface is large. The ADC12 alloy has a small liquidus and solidus on the phase diagram, resulting in its solidification method It is characterized by layered solidification. During the solidification process, the solidification area on the section of the casting is very narrow, and the liquid near the solidification front has a low temperature and solidifies on it first. The mole fraction of the solute in the solidified crystal is lower than the average content, and the excess solute atoms are repelled in the surrounding liquid, so that the freezing point of this part of the liquid is lowered, and the crystal growth is temporarily stopped. The temperature of the liquid drops, the liquid metal close to the solid crystallizes on the front again, and the solidification continues. The narrower the solidification zone, the greater the tendency to develop into columnar crystals. During laminar solidification, the solidification front directly contacts the liquid metal. When the liquid solidifies and shrinks in volume, it can be continuously supplemented by liquid. Therefore, the tendency of dispersive shrinkage is small, and the hardness of thin-walled samples is high.
3in conclusion
(1) Under the test conditions, the extrusion force decreases with the increase of the distance from the inner gate, the degree of subcooling decreases, the grains are coarse, and the grain size changes from 18.35 μm near the gate to far casting. 39.85 μm at the track position.
(2) As the distance to the inner runner increases, the extrusion force decreases, and the copper content in the core of the sample decreases, from 1.73% to 1.77% on the surface to 1.81% to 1.87% in the core. The hardness value of the core decreases.
(3) Due to the effect of Al2Cu phase channel segregation, as the distance from the sample surface increases, the copper content of the sample increases, while the hardness value decreases. The maximum Cu content in the core of sample 4 is 1.87%, and the hardness (HV) is 96.
(4) As the wall thickness increases, the cooling rate of the sample decreases, the sample grain size changes from 18.25 μm to 45.22 μm, and the copper content in the core increases, while the hardness value of the core decreases. Sample 6 has the lowest hardness value of 97HV.


.png)


.png) +86-574-83036520
+86-574-83036520 +86-574-83008051
 sales@innovaw.com

.png)

.png)
.png)
.png)

.png)
.png)
.png)





.png)

