Abstract|Based on the as-supplied experimental steel for the die-casting mold baffle, it was subjected to homogenization annealing at 1100 ℃ for 2 h, water quenching at 880 ℃ for 30 min, and tempering at 200 ℃ and 250 ℃ for 2 h, respectively. The microstructure, macrohardness, tensile properties and wear resistance were measured. The results show that after quenching and tempering, the flaky pearlite and reticulated ferrite in the experimental steel as supplied by the die are transformed into tempered martensite and a small amount of retained austenite, and the tensile strength and hardness are significantly increased. . The wear resistance of quenched + 200 ℃ tempering test steel is the best, followed by 250 ℃ tempering, both of which are better than the wear resistance of the as-delivered mold.
The aluminum alloy die-casting mold baffle is subjected to large compressive stress and friction during the continuous operation of the die-casting machine. During its service process, it is required to maintain good dimensional accuracy even after long-term work to ensure that it will not be caused by long-term work. The surface is uneven, which affects the normal operation of the die casting machine. Wear is one of the main forms of material failure. Usually the machine relies on the relative movement between its parts to operate. Under the working environment for a long time, the parts will gradually wear out, causing the surface to be damaged to a certain extent and fail. , which will affect the normal operation of the machine.
The heat treatment process determines the microstructure of the material and thus affects its mechanical properties. The selection of an appropriate heat treatment process is expected to improve the material's ability to resist fracture deformation and wear. Zhao Yunchong studied the effect of heat treatment process on the wear resistance of low-alloy wear-resistant steel plates, and found that hardness is the main macroscopic factor reflecting the wear resistance of materials. The tempered martensite structure obtained by low-temperature tempering after quenching has better Abrasion resistance. Deng Jinjun[7] used different heat treatment processes to treat high-chromium cast iron, and found that after 1050 ℃ × 0.5 h + 280 ℃ × 1.5 h treatment, compared with as-cast high-chromium cast iron, the wear amount was reduced by about 35%. In order to make the die-casting mold baffle serve for a longer time, reduce the number of stoppages to replace the baffle, and reduce the operating cost of the die-casting production line, this topic intends to analyze the structure and properties of the physical material in service and try to analyze its structure and properties from the perspective of heat treatment technology. The improvement and promotion aim to provide a reference for achieving better performance status during the operation and service of the die-casting machine.
1 Test materials and methods
The chemical composition of the experimental steel in the as-delivered state of the mold was determined by the mobile direct-reading spectrometer PMI-MASTER PRO, and the results are shown in Table 1.

Table 1: Chemical composition of experimental steel (wb/%)
Heat treatment was carried out in YFA12/15G-Y box-type resistance furnace, and the heat treatment process adopted was as follows: (1) Hold at 1100 °C for 2 h and then cool down to room temperature for homogenization annealing; (2) Heat and hold at 880 °C for 30 min, water quenching; ③Tempering at 200 and 250 ℃ for 2 h respectively. The experimental steel was cut into a sample with a size of 10 mm × 10 mm × 6 mm, and it was ground on sandpaper. After mechanical polishing, 4 % nitric acid alcohol solution was dripped on the surface of the sample for corrosion, and the corrosion time was After 15 s, the corroded samples were observed by optical microscope and tungsten filament scanning electron microscope (SEM). The hardness value of the experimental steel was measured on a Browwell optical hardness tester with a test force of 750 N, and 5 points were averaged on each sample, and the average value was taken as the hardness value of the sample. The dry sliding friction test was carried out on the vertical MM-W1 universal friction and wear testing machine. The test adopts the pin-disk contact method. The structure diagram is shown in Figure 1. The diameter of the pin is 6 mm and the height is 8.5 mm. The friction pair is a GCr15 disc (hardness 61HRC), the load is 60 N, the rotation radius is 10 mm, the rotational speed is 100 r/min, and the wear rate calculation formula is E = (E0-E1) / S, where E0 is the friction test The mass of the test pin before, E1 is the mass of the test pin after the friction test, and S is the wear distance. Electrolytic separation and extraction tests were carried out on the experimental steels in 3 different states, so as to obtain the precipitates in 3 different states and weigh them. Electrolytic extraction was performed with a solution of 375 mL H2O+120 mL HCL and 16 g citric acid particles. After precipitation, centrifugation and drying, the extracted precipitate was analyzed by XRD. The test angle ranged from 10° to 90°. , with a scan rate of 4°/min. The experimental steel after heat treatment was processed into non-standard tensile specimens by wire cutting, with a gauge length of 10 mm and a thickness of 1 mm. The specific dimensions are shown in Figure 2, and then a CMT5105 electronic universal testing machine was used to conduct tensile tests at room temperature. .
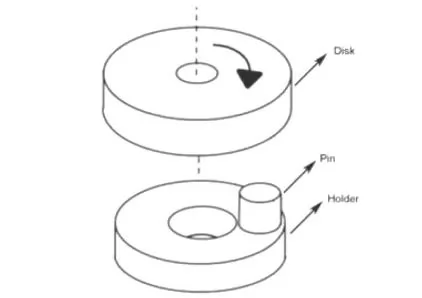
Figure 1: Schematic diagram of friction and wear pin-disc structure

Figure 2: Schematic diagram of the dimensions of the stretched sample
2 Test results and analysis
2.1 Microstructure
Figure 3 shows the microstructure of the experimental steel in different states. It can be seen from Figure 3a that the room temperature microstructure of the experimental steel in the supply state of the mold is composed of white ferrite and flaky pearlite with a network distribution. The body is distributed between the flaky pearlite along the grain boundary, which destroys the continuity between the tissues, thereby damaging the matrix structure, and the hardness, tensile strength and wear resistance of the material itself will be significantly adversely affected. , when the material is squeezed by external force and small cracks appear, the cracks will rapidly extend and expand along the ferrite in the form of a network, making the workpiece more susceptible to damage and fracture. Some studies have pointed out that during the cooling process, the excess iron will be precipitated from the inside of the grain to the outside of the grain in the supercooled austenite, so as to achieve the purpose of maintaining its own phase balance and stability, thus forming a pre-coated austenite. In the ferrite phase, since the process of precipitation to the outside of the grain is not directional, these iron elements will gradually be enriched on the grain boundaries of the grains from which they are precipitated, so that the entire ferrite will be deposited along the periphery. The intenite grains are "wrapped", so the microstructure of the network ferrite is presented. Furthermore, in addition to the observation of the reticulated ferrite structure, the existence of the Widmandelsteiner structure was also found. The formation of Widmanstatt structure is mainly due to the formation of pro-eutectoid ferrite on the austenite grain boundary when hypoeutectoid steel or hypereutectoid steel is cooled at a higher temperature It grows rapidly inside and is distributed in the matrix structure in a needle shape. This structure is one of the defects generated during processing. The appearance of Widmanners structure will reduce the strength and hardness of the material, reduce the plasticity and toughness, and affect the performance of the material. service life.
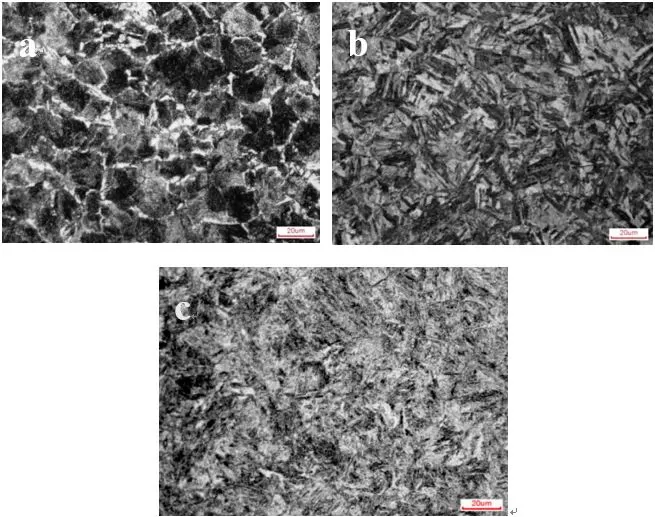
Figure 3: Microstructure of experimental steel in different states
(a) Die supply state (b) Quenching at 880℃+Tempering at 200℃ (c) Quenching at 880℃+Tempering at 250℃
After high-temperature annealing, 880 ℃ quenching was performed to obtain a complete quenched martensite structure at room temperature, followed by tempering at 200 ℃ and 250 ℃ respectively. With the increase of tempering temperature, lath martensite gradually decomposed. It can be seen from Figure 3b that the shape of the martensite lath is still clear. This is because the energy state of the precipitated carbides is higher than that of the segregation of carbon atoms when the tempering temperature is low and the martensite with low carbon content is tempered. , so the carbon atoms will still segregate near the dislocation line. In addition, it can be observed that a small amount of retained austenite is distributed between the martensitic laths, that is, the experimental steel is tempered martensite and a small amount of retained austenite after quenching and tempering at 200 ℃. It can be seen from Fig. 3c that, compared with the structure tempered at 200 ℃, there is a slight difference after tempering at 250 ℃, the lath martensite bundle becomes less obvious, and the structure is more uniform, and at the same time, the carbon atoms gradually change from the matrix. The carbon content in the matrix decreases, and a small amount of ε-carbide is formed to precipitate and disperse in the matrix.
Figure 4 shows the SEM microstructure of the experimental steel in different states. It can be seen that in the experimental steel microstructure in the as-supplied state of the mold, there are many cementite particles distributed on the flaky pearlite, and the particles are dispersed on the matrix, which plays a certain role. strengthening effect. After tempering at 200 ℃, the lath martensite is still clearly visible, the carbide precipitation is not obvious, and the original austenite grain boundary is clearly visible. As the tempering temperature increases, after tempering at 250 ℃, the martensite is further decomposed and carbon atoms are precipitated. In addition, the dislocation movement in the martensite lath gradually intensifies, causing dislocations with opposite orientations to meet and annihilate , the martensite lath boundary undergoes a series of processes such as interatomic diffusion, enrichment, merging and recombination, which makes the martensitic lath bundle gradually blurred, the number and density of dislocations decrease, and the internal stress is gradually eliminated.
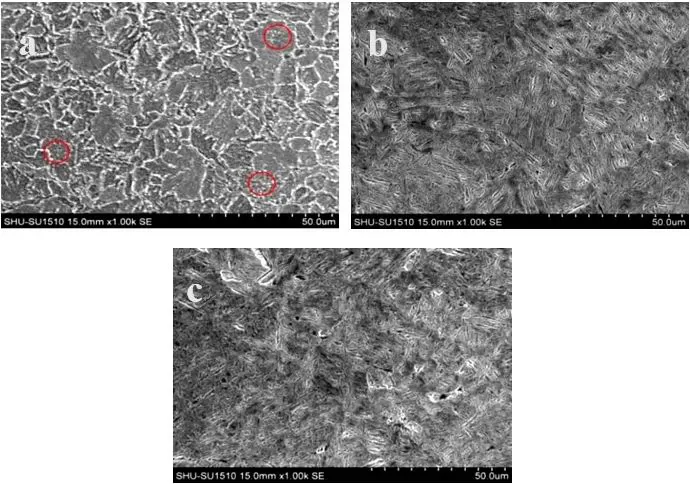
Figure 4: SEM images of experimental steel in different states
(a) Mold supply state (b) Tempered at 200℃ (c) Tempered at 250℃
2.2 Tensile mechanical properties
The results of the macro hardness test of the experimental steel in different states are shown in Figure 5. After quenching and tempering at 200 ℃, the hardness of the experimental steel reaches a maximum of 480.1 HBW. When the tempering temperature increases to 250 ℃, the hardness decreases to 405.3 HBW. The reason The main reason is that the process of low temperature tempering is actually the process of the gradual decomposition of supersaturated martensite. As the tempering temperature increases, the activity of carbon atoms increases, and the carbon atoms dissolved in martensite will gradually progress for a long time. Diffusion and formation of fine and dispersed carbide precipitation reduces the carbon content in martensite, softens the matrix, and shows a decrease in hardness on a macroscopic scale. In addition, the hardness of the experimental steel in the as-supplied mold is significantly lower than that of the experimental steel after quenching and tempering, which is inseparable from the relationship between the respective microstructures. The experimental steel in the as-supplied mold is composed of flaky pearlite. It is composed of ferrite and reticulated ferrite, and ferrite is a soft phase, and pearlite is composed of ferrite and cementite. The existence of cementite will increase the effect of pearlite to a certain extent. However, since the carbon content in the experimental steel is 0.48%, according to the leverage law, the proportion of cementite in the pearlite is about 7%, so the hardness of the ferrite and pearlite structures is different. Not big, all have low hardness. However, the matrix structure of the experimental steel obtained by tempering at 200 ℃ and 250 ℃ is a tempered martensite structure, and its structure hardness is much higher than that of pearlite and ferrite structure, so that the hardness of the experimental steel after quenching and tempering is significantly improved. This lays the foundation for good wear resistance.
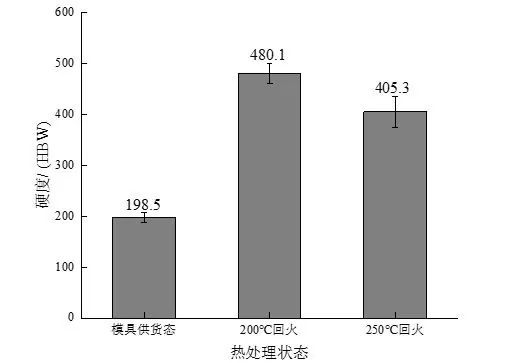
Figure 5: Hardness curves of experimental steels in different states
Tensile experiments were carried out on the experimental steel samples in different states, and the changes in tensile strength and elongation were measured as shown in Figure 6. Compared with the as-supplied mold, the tensile strength of the experimental steel after quenching and low-temperature tempering is significantly improved, from 650 MPa to 1287.8 MPa and 728.3 MPa, respectively. Due to the existence of reticulated ferrite and Widmancer's structure, the experimental steel in the supply state of the mold will cause the continuity of the internal structure of the matrix to be destroyed, and secondly, the connection between the pearlite structure will be severely broken, making its tensile strength large. The amplitude is reduced, and it is easy to deform and break when subjected to external forces. Compared with tempering at 200 ℃, it can be found that the elongation of the experimental steel increases and the tensile strength decreases after tempering at 250 ℃, mainly because the martensite of the experimental steel is further decomposed after tempering at 250 ℃. , the existing form of carbon atoms has changed, from solid solution to supersaturated martensite gradually transformed into carbide, and precipitation, resulting in weakened lattice distortion effect. Due to the low tempering temperature, the precipitated carbides are too small, so that the effect of the dispersion strengthening effect of the precipitates is less than the effect of weakening the solid solution strengthening effect caused by the reduction of supersaturation. The internal stress is released to a certain extent, and the dislocation density gradually decreases, thus showing the phenomenon that the tensile strength increases and the elongation decreases. To sum up, in this experiment, the heat treatment process was improved on the basis of the supply state of the mold. After quenching and low temperature tempering, the strength and hardness of the experimental steel were significantly improved, and after 200 ℃ After tempering, its hardness and tensile strength are the highest, and the elongation after tempering at 250 ℃ is the best. However, the main purpose of the research is to improve its wear resistance in the working environment, so it is necessary to further test the wear resistance of experimental steels in different states. A comparative study of sex.
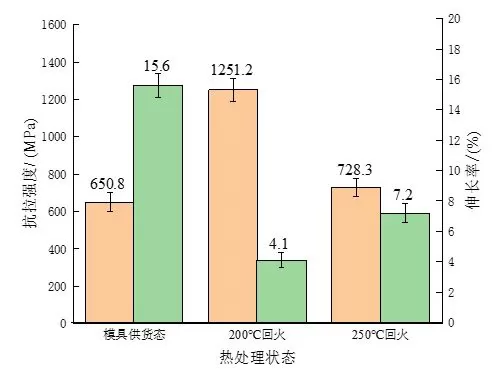
Figure 6: Changes in tensile strength and elongation of experimental steel in different states
2.3 Wear resistance test
Figure 7 shows the wear rates of experimental steels in different states under the condition that the wear time is 30 min. It can be seen that the wear rate of the experimental steel after quenching at 880 ℃ + tempering at 200 and 250 ℃ is greatly reduced compared with the experimental steel in the as-delivered state of the mold. wear resistance.
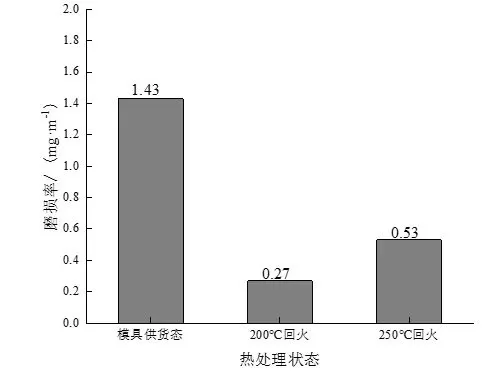
Figure 7: Wear rates of experimental steels in different states under dry friction conditions
Figure 8 shows the friction factors corresponding to the experimental steel in the three states, and it can be clearly seen that the wear process shows two stages. First of all, point contact or line contact will first be made between the experimental steel and the asperities with higher contact surfaces of the anti-abrasive material, and will soon be deformed, broken or flattened by collision in the subsequent wear process, and then there will be A small amount of wear debris will be generated, and the wear debris will be distributed on the contact surface to increase the friction surface roughness, resulting in a gradual increase in the friction factor. This stage is the running period. With the increase of friction time, under the action of external pressure, the remaining microprotrusions on the friction surface of the material continue to contact, resulting in severe deformation and fracture, resulting in the contact between the material surfaces from the initial point contact and line contact to slowly change to In the contact between the two surfaces, the actual contact area increases during relative movement, resulting in greater wear and increasing wear debris.
When the number of wear debris increases to a certain extent, a layer of wear debris film that reduces material wear is gradually formed due to external pressure, and the friction factor no longer increases with the progress of the wear process, which is the stable friction stage.
In addition, as the friction continues, the wear debris film is continuously destroyed and then new wear debris is formed. The new wear debris gradually forms a new wear debris film under the extrusion of external force. When the wear debris film is formed and disappears When a dynamic equilibrium is reached, the friction factor will fluctuate intermittently.
Comparing the wear process and friction factor of the three experimental steels, it can be found that the friction factor of the experimental steel in the as-supplied state of the mold gradually increases during the wear process of 1 800 s, and it is obvious from Figure 8 that in the three states Its friction coefficient is the highest, with an average of 0.51, indicating that its wear resistance is the worst, which is also consistent with the highest wear rate in the as-delivered state of the mold. In addition, combined with its microstructure, it is a two-phase structure of reticulated ferrite and flaky pearlite, with low macroscopic hardness and relatively poor wear resistance. After quenching at +200 ℃ and tempering at 250 ℃, the average friction coefficient of the experimental steel was significantly reduced, which were 0.38 and 0.40, respectively. The relationship between the formation of tempered martensite structure is inseparable.
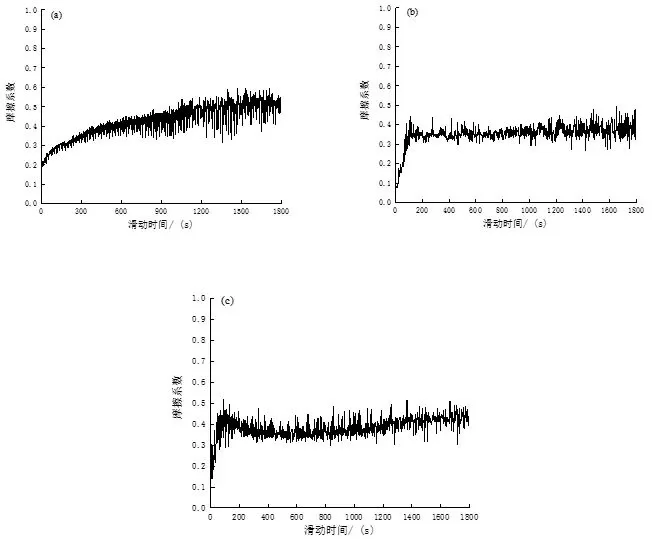
Fig. 8: Variation curve of friction coefficient of experimental steel with sliding time under different conditions
(a) Mold supply state (b) Tempering at 200°C (c) Tempering at 250°C
2.4 XRD analysis of precipitates
Quantitative analysis of the precipitates after the electrolytic extraction of the experimental steel sample is carried out. The results are shown in Figure 9a. It can be found that with the increase of the tempering temperature, the content of the precipitates fluctuates slightly. The precipitates were then subjected to XRD analysis, and the results are shown in Figure 9b.
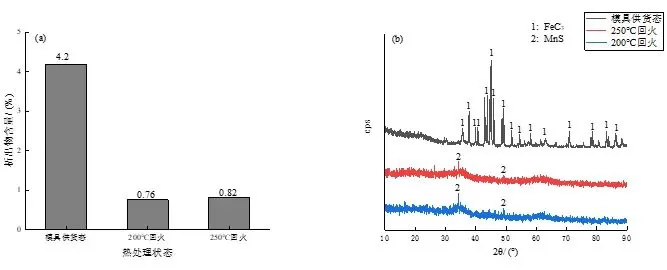
Fig. 9: Precipitate content and XRD analysis of experimental steel under different conditions
It can be seen that the precipitates of the experimental steel in the supply state of the mold are cementite, which is the same as the precipitates observed under the scanning electron microscope, that is, cementite particles, and the microstructure of the experimental steel in the supply state of the mold is precisely composed of flaky pearlite. It is composed of microstructure and reticulated ferrite, in which pearlite is a mechanical mixture composed of α phase and cementite, so the precipitates in the XRD analysis results are cementite, and the existence of cementite will be to a certain extent. The wear resistance of the material is improved, but the wear resistance is still low due to the matrix structure of reticulated ferrite and flaky pearlite.
After tempering at 200 ℃ and 250 ℃, the XRD analysis shows no obvious diffraction peaks. It can be seen from Figure 9b that a very small amount of MnS is precipitated, which is one of the most common non-metallic plastic inclusions in steel. , carbide precipitation was not observed, but considering that its matrix structure is tempered martensite and a small amount of retained austenite, it is essentially different from the supply state of the mold, which is precisely due to the obvious improvement of the matrix structure. The wear resistance of the experimental steel was significantly improved after quenching and tempering.
3 Conclusion
(1) After quenching and tempering, the experimental steel transformed from the flaky pearlite and reticulated ferrite in the as-supplied state to tempered martensite and a small amount of retained austenite, and the mechanical properties were greatly improved. After quenching and tempering at 200 ℃, the tensile strength and hardness of the experimental steel reached the maximum value of 1287.8 MPa and 480.1 HBW, respectively. And as the tempering temperature reaches 250°C, the tensile strength and hardness decrease.
(2) The experimental steel in the as-supplied state of the mold contains the highest content of precipitates FeC3, while the experimental steel after quenching and tempering has very little precipitates, and only a small amount of MnS non-metallic inclusions are found.
(3) The wear rate and friction factor of the experimental steel in the as-delivered state of the mold are the highest, and the wear rate and friction factor of the steel after quenching and tempering at 200 ℃ are the lowest, which are 0.27% and 0.38, respectively, followed by tempering at 250 ℃. Comprehensively considering the test results of the wear resistance of the experimental steel in different states, it is determined that the experimental steel after quenching and tempering at 200 ℃ has the best wear resistance, followed by tempering at 250 ℃, both of which are better than the wear resistance of the as-supplied mold. .


.png)


.png) +86-574-83036520
+86-574-83036520 +86-574-83008051
 sales@innovaw.com

.png)

.png)
.png)
.png)

.png)
.png)
.png)





.png)

