Summary:The hot cracking tendency (HTS) of Al-Zn-Mg-Cu alloy semi-solid rheological die castings was evaluated by semi-quantitative hot cracking tendency evaluation method. Cross-section hole distribution. The results show that when the supercharging specific pressure is 67-94 MPa, the hot cracking tendency of the alloy first decreases and then increases with the increase of the supercharging specific pressure. When the supercharging specific pressure is 87 MPa, the hot cracking tendency coefficient is the smallest 15. When it continues to increase to 94 MPa, the hot cracking tendency is the highest, and the HTS value is 27. The internal cavity of the sample has the most severe influence on the hot crack, which is the origin of the hot crack initiation. The intergranular separation caused by insufficient solidification and feeding of the alloy is the main reason for the generation of pores. Increasing the supercharging specific pressure can effectively reduce the porosity of the casting, but too high supercharging specific pressure will form an impact force on the solidifying casting, causing Castings crack and exacerbate hot cracking tendencies.
Al-Zn-Mg-Cu high-strength aluminum alloys are widely used in aerospace, transportation and other fields due to their excellent properties. Cracking, often resulting in low yield, limiting its application range. The rheological die casting technology has the characteristics of uniform and small structure, nearly spherical, not easy to entrain air during filling, small solidification shrinkage and high pressure feeding, etc. control. Therefore, understanding the hot cracking mechanism in the process of Al-Zn-Mg-Cu alloy rheological die-casting, and adjusting the process parameters to effectively control the generation of defects such as hot cracking and holes is the key to realize casting high-strength aluminum alloy parts and large-scale applications. The essential. The generation of hot cracking defects is closely related to holes. In rheological die casting, holes are often mainly caused by shrinkage cavities. Although a large number of researchers have conducted a series of studies on the mechanism and influencing factors of hot cracking, there are few reports on the hot cracking tendency of Al-Zn-Mg-Cu alloys during rheological die-casting. This topic is oriented to explore the hot cracking tendency of rheological die-casting Al-Zn-Mg-Cu high-strength aluminum alloys, and adopts a semi-quantitative hot cracking evaluation method to analyze the fracture structure and microscopic morphology of the hot cracked samples. The effect of supercharging specific pressure on hot cracking tendency was studied.
1 Test materials and methods
The material used in this test is Al-Zn-Mg-Cu alloy, and its chemical composition is shown in Table 1.

Table 1 Chemical composition of Al-Zn-Mg-Cu alloy used in the experiment wb/%
In the experiment, the Al-Zn-Mg-Cu alloy raw material was melted to 720 ℃ in a resistance furnace, kept for 30 min to eliminate the heredity of the charge, and the melt was continuously refined with argon gas for about 10 min, and then left to stand after degassing and slag removal. Then, the slurry in the resistance furnace was transferred to the EMS-05SM temperature-controlled electromagnetic stirring furnace, and argon was again introduced for about 5 minutes for degassing. When the melt was cooled to 640 ° C, the electromagnetic stirring was started immediately. The stirring power was fixed at 3 kW, and the stirring frequency was constant at 20 Hz. During the electromagnetic stirring, the temperature of the metal slurry was monitored with a K-type thermocouple in time, and the desired semi-solid slurry was prepared for rheological die casting when the slurry was cooled to 630 °C.
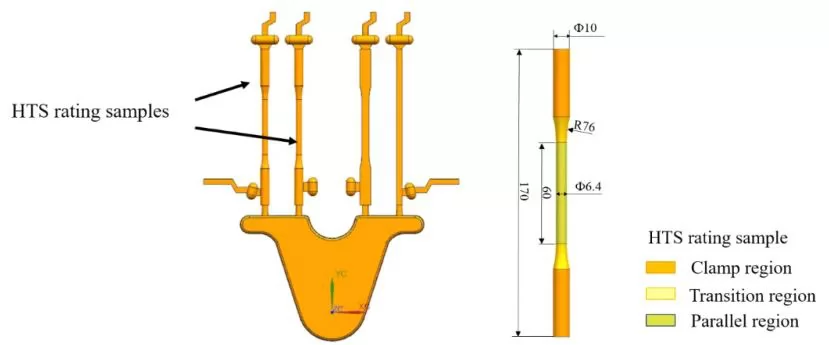
The castings were die-casted under different pressure ratios, and 20 hot cracking evaluation samples were obtained to evaluate the hot cracking tendency, as shown in Figure 1. The specimen consists of 3 parts: clamping section, transition section and parallel section. The hot cracking tendency of Al-Zn-Mg-Cu alloy die castings is studied by semi-quantitative hot cracking tendency evaluation method. This method mainly considers two factors: the degree of cracks generated by hot cracking and the number of hot cracks, and each factor is divided into different The hot cracking tendency is comprehensively assessed by grade, and the calculation method is as follows:

After preparing the samples for evaluating the tendency of hot cracking, observe the degree and quantity of hot cracking of the samples under a low-power optical microscope, and draw a graph of the relationship between the results. The specimen microstructure was observed using an optical microscope and a scanning electron microscope equipped with EDS. For pore statistics, the specimens were sectioned by wire cutting along the axis of the specimen, and the equivalent diameter and shape factor of the pores were statistically analyzed by Image J software. The equivalent diameter D, shape factor F and porosity P are defined as follows:

In the formula, A is the average area of a single hole, μm2; P is the average perimeter of a single hole, μm; SH is the total area of the holes in the cut section of the hot-cracked specimen, μm2; S is the statistical cross-sectional area, μm2.
2 Test results and discussion
2.1 Hot cracking tendency

Table 2 Number and probability of thermal cracking of samples
Note: NHT is the number of hot cracks, and PHT is the probability of hot cracks.
Table 2 shows the hot crack distribution and statistical results of Al-Zn-Mg-Cu alloy rheological die-casting samples under different pressure ratios. It can be seen that under different boost ratio pressures, the thermal cracking of the sample is mainly in the form of fracture. The fracture mainly occurred in the transition section and parallel section of the specimen, and no fracture behavior occurred in the clamping section. There is little difference in the number of fractures in the two regions under different pressure ratios, and the number of fractures in the parallel section is slightly higher than that in the transition section. The results of the hot cracking evaluation sample were statistically converted into the hot cracking tendency value HTS, and the results are shown in Figure 2. It can be seen that with the increase of the supercharging specific pressure, the hot cracking tendency value HTS of the Al-Zn-Mg-Cu alloy rheological die-casting sample first decreases and then increases. When the supercharging specific pressure is 87 MPa, the minimum HTS is 15, and when the supercharging specific pressure is increased to 94 MPa, the HTS is 27 at the maximum, which has the most serious hot cracking tendency.
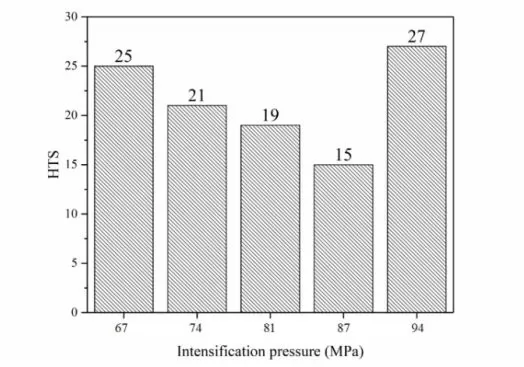
Fig. 2 Relationship between supercharging specific pressure and hot cracking tendency coefficient
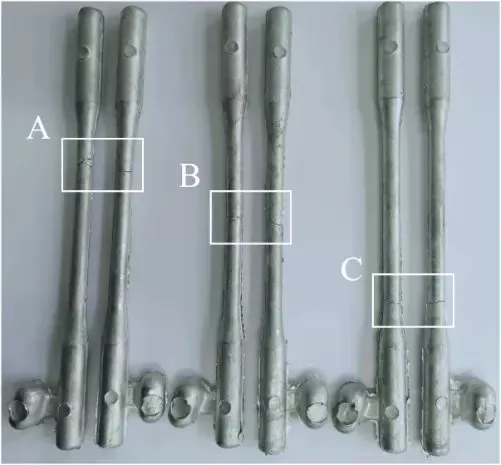
Fig.3 Typical distribution locations of specimen fracture behavior
Figure 3 shows the typical distribution area where fractures occur. Area A is the intersection of the parallel section and the transition section away from the ingate, area B is the middle of the parallel section, and area C is the intersection of the parallel section and the transition section near the ingate. After statistics, it is found that when the supercharging specific pressure is greater than 81 MPa, there will be a large number of fractures in the C area, and when the supercharging specific pressure is lower than 81 MPa, the fractures are concentrated in the A and B areas.
2.2 Fracture morphology
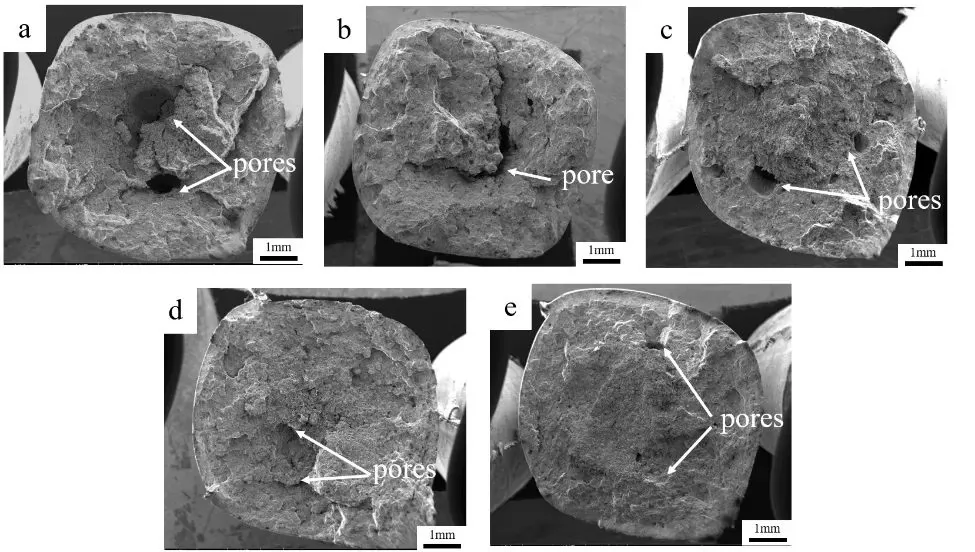
Fig. 4 Typical morphologies of specimen fractures under different pressure ratios:
(a) 67 MPa; (b) 74 MPa; (c) 81 MPa; (d) 87 MPa; (e) 94 MPa
Figure 4 shows the hot fracture morphologies of Al-Zn-Mg-Cu alloy samples prepared by pressure-rheological die-casting with different boost ratios. It can be seen that the fracture surface of the samples has the distribution of shrinkage cavity defects, and the flatness of the section is not high. With the increase of the supercharging specific pressure, the shrinkage pore gradually expands outward from the center of the sample, and the size of the shrinkage pore changes significantly. When the specific pressure is less than 81 MPa, there are large shrinkage holes in the central area of the fracture. In the central area of the fracture, the existence of tissue porosity can no longer be clearly seen, and the size of the shrinkage cavity is further reduced. In addition, in all the fracture edge areas, it can be seen that there are relatively flat cross-sectional areas, and the structure is relatively uniform and dense.
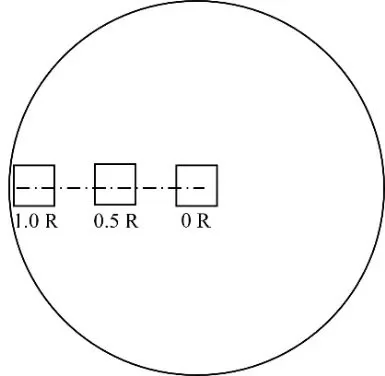
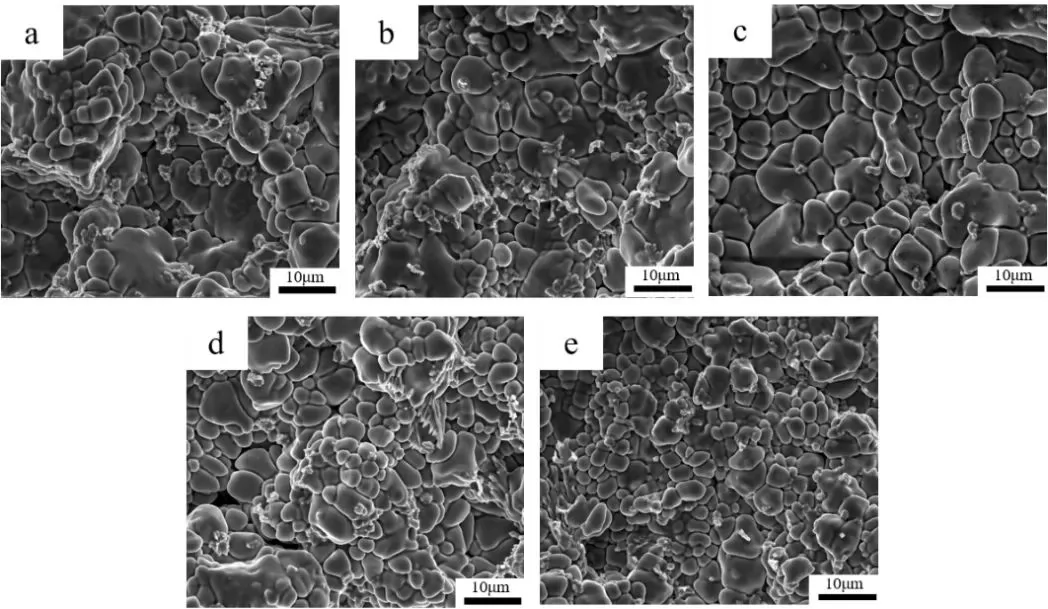
Fig.6 Morphology of the fracture core region of Al-Zn-Mg-Cu rheological die-casting specimen:
(a) 67 MPa; (b) 74 MPa; (c) 81 MPa; (d) 87 MPa; (e) 94 MPa
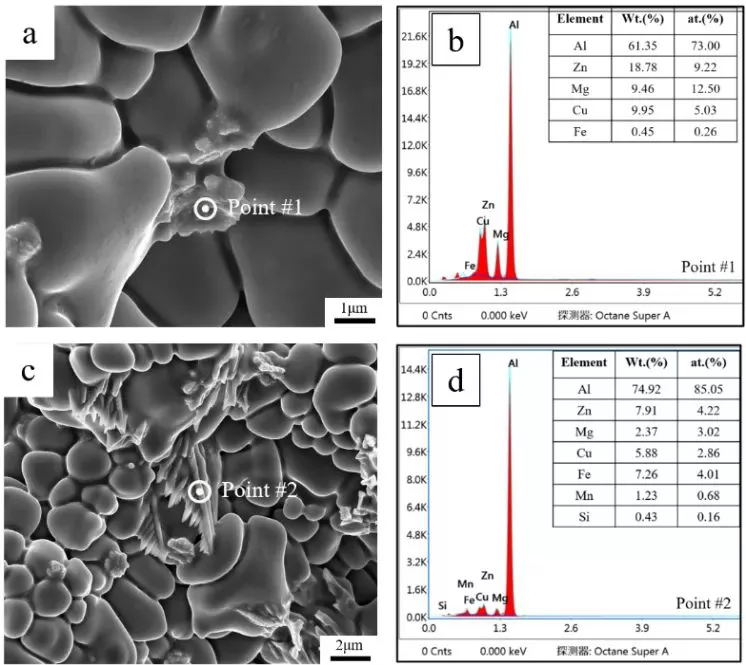
Fig.7 High magnification image of particles on the fracture surface and EDS results
High magnification image of the fracture tail (a) and its EDS result (b); high magnification image of the precipitate (c) and its EDS result (d)
Figure 5 is a schematic diagram of the sampling of the fracture diameter. Microscopic observation of the microstructure of the central area where the fracture diameter is about 0R is shown in Figure 6. The primary α-Al grains are relatively complete under different supercharging ratios, indicating that hot cracking is a typical brittle edge in this area. Crystal fracture characteristics. At the same time, there are irregular particles on the fracture. After identification, it can be divided into two types: cluster-like fractured tail tip and sheet-like precipitation tissue. Figure 7 shows the high magnification images of two irregular particles and their EDS test results. It can be seen from Figure 7a that the fracture tail is mainly generated at the grain boundary where multiple grains meet. The theory of successful crack formation believes that the nucleation of cracks usually occurs in the liquid phase convergence area where the solid phase grains intersect. The segregation of boundary components causes the change of the bilateral angle of the liquid phase in the convergence area. The smaller the bilateral angle of the liquid is, the easier the crack formation is. It can also be seen from the EDS test results that the segregation of Zn, Mg and Cu in the fracture tail is very serious, and the Zn mass fraction even reaches 18.78%. In the Al-Zn-Mg-Cu alloy, the hot cracking tendency of the alloy is almost the same as that of the alloy. The Zn content is proportional. Figure 7c is a high magnification view of the strip-like precipitates, which are formed by the aggregation of several strip-like structures and are rarely distributed on the fracture surface. It can be seen from EDS analysis that the Fe content of the precipitation structure is still higher than that of the matrix (Table 1). Fe element can form more phases in aluminum alloys, such as intermetallic compounds such as Al6Fe, Al3Fe, Al7Cu2Fe, etc. These phases mainly exist as insoluble or insoluble brittle phases. When the content of Fe element in the aluminum alloy reaches more than 0.3%, a coarse needle-like iron-containing phase will be formed, which is relatively brittle and severely splits the matrix, and has a low bonding strength with the matrix and is easy to peel off.
Figure 8 shows the microstructure of the edge region at the fracture diameter of about 1.0R, and there are a large number of dimples on the fracture edge of the die casting under different pressure ratios. Macroscopically, the fracture of the Al-Zn-Mg-Cu alloy rheological die-casting specimen is characterized by brittle fracture, and there can also be plastic deformation in the local area, which is manifested as dimples. The fracture form can be judged as micropore aggregate fracture, which is a ductile fracture. It is manifested as macroscopic brittle microporous fracture. This type of fracture usually occurs when the high-strength material crack sample is stretched at room temperature, and the toughness of the material is insufficient when the crack propagates. The microstructure is small and uniformly distributed. hole. Figure 9 is a high-magnification microscopic topography of the dimple, in which the largest dimple diameter can reach more than 28 μm, and cracks and precipitates can be seen at the bottom of the dimple.
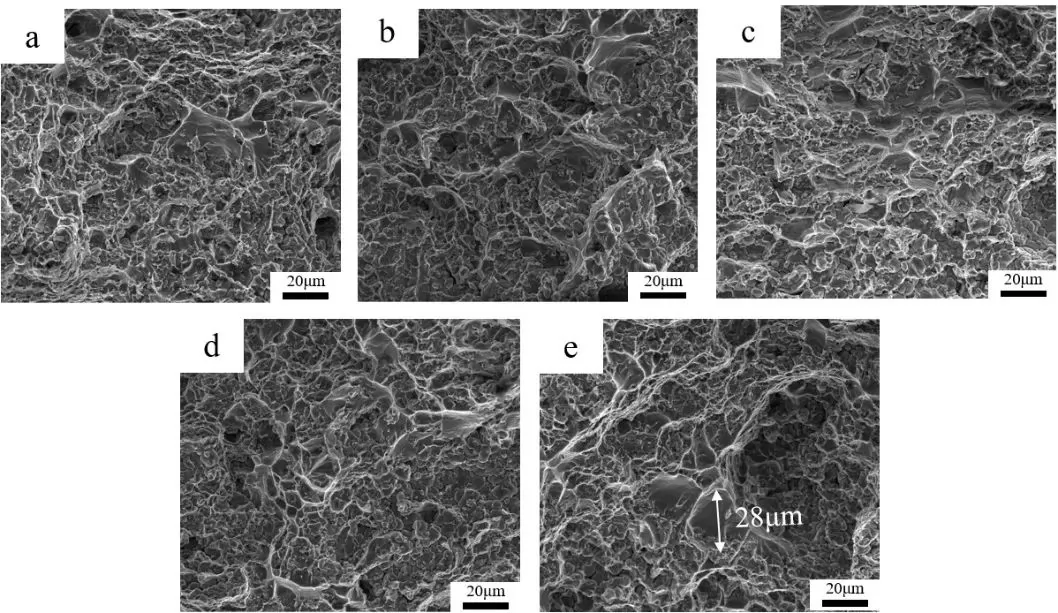
Fig.8 Morphology of fracture edge region of Al-Zn-Mg-Cu rheological die-casting specimen:
(a) 67 MPa; (b) 74 MPa; (c) 81 MPa; (d) 87 MPa; (e) 94 MPa
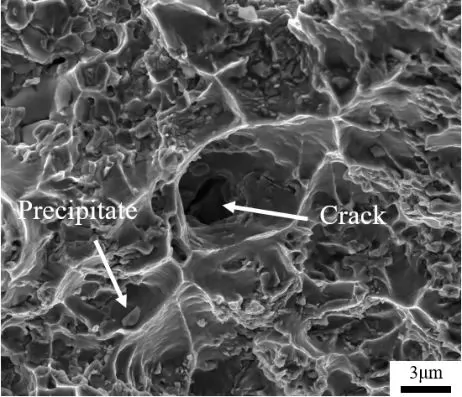
Fig. 9 Microscopic morphology of dimples
The hot crack is macroscopically brittle fracture (Fig. 4), but plastic deformation and dimples appear near the fracture edge of the specimen (Fig. 8). Therefore, the fracture of Al-Zn-Mg-Cu alloy rheological die-casting is divided into three stages, as shown in Figure 10: Stage I is in the central region of the sample, which is also the main location of the crack source, showing brittle fracture characteristics. Its formation is mainly affected by insufficient feeding in the core of the sample, especially when the supercharging specific pressure is small, large shrinkage cavities are formed and lead to the formation and expansion of crack sources; Stage II is a combination of brittle-ductile fractures, and this region is The transition stage of fracture; Stage III is the ductile fracture stage, this area is close to the surface of the sample, the grain structure is fine and uniform, and has better toughness, so dimples appear on the fracture surface. This stage is also the last stage of fracture, which should be an instant fracture when the critical value is reached. The bonding strength of grain boundaries is the main factor affecting crack propagation, and the precipitated Fe-rich phase will weaken the grain boundaries, promote crack propagation, and increase the possibility of hot cracking.
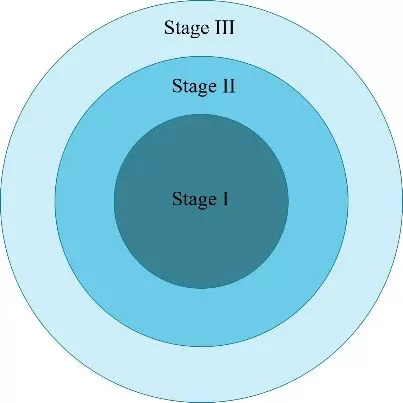
Fig.10 Schematic diagram of fracture stage of Al-Zn-Mg-Cu alloy rheological die casting
2.3 Porosity

Fig.11 Macroscopic morphologies of cross-sections of Al-Zn-Mg-Cu alloy rheological die-casting samples with different boost ratios
Figure 11 shows the typical macroscopic morphology of Al-Zn-Mg-Cu alloy rheological die-casting hot crack evaluation samples after cutting under different pressure ratios. Under different supercharging ratio pressures, there are visible holes in the cross section of the sample. The number and size of the holes gradually decrease with the direction of approaching the ingate as a whole, and with the increase of supercharging ratio pressure, the profile of the Fewer void defects. At the fracture position of the sample, hole defects can be seen. At 67 and 74 MPa, large holes can be seen in the fracture area, and the crack at the fracture is like a "V" shape; when the supercharging specific pressure is higher than 74 MPa, The hole at the fracture is smaller, and the crack at the fracture is more straight, so it can be predicted that the hole is the most important factor leading to thermal cracking. In addition, it can be seen that the fracture mainly occurs in the parallel segment region, and although the clamping segment has larger sized holes, no fracture occurs. This is mainly related to the smaller diameter of the parallel section. The existence of hole defects will reduce the effective bearing area of shrinkage stress and strain when the casting is solidified, which is more likely to lead to the formation of cracks.
Figure 12 shows the statistical results of the cross-sectional porosity of Al-Zn-Mg-Cu alloy rheological die-casting fracture specimens under various pressure ratios. The porosity gradually decreases as the boost ratio increases. When the supercharging specific pressure is 67 MPa, the porosity is higher, which is 7.6%. When the supercharging specific pressure is 94 MPa, the porosity is 2.2%, and the porosity decreases by about 71.1%. However, when comparing the HTS values of the two, it can be seen that the HTS value is higher than that of 67 MPa when the supercharging specific pressure is 94 MPa, which indicates that when the specific pressure increases to a certain extent, porosity is not the most influential factor for thermal cracking. The HTS value of the Al-Zn-Mg-Cu alloy rheological die-casting sample is the lowest when the supercharging specific pressure is 87 MPa, which is 15, and the porosity at this time is 2.6%, which is different from that when the supercharging specific pressure is 94 MPa. The porosity is only lower than 0.4%, but the HTS value is 27 when the supercharging specific pressure is 94 MPa, which is 80% higher than that of 87 MPa.
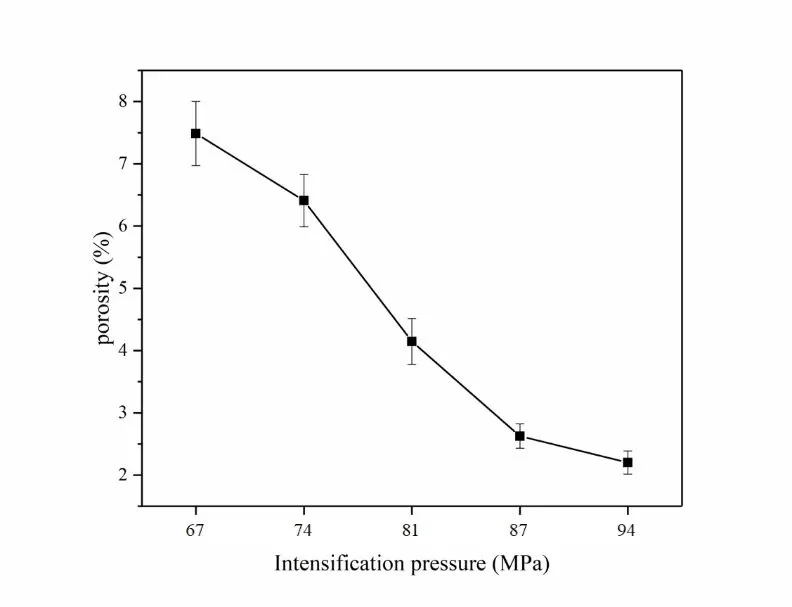
Fig.12 Porosity statistics of Al-Zn-Mg-Cu alloy rheological die castings under different pressure ratios
Figure 13 shows the relationship between the number and shape factor of the holes in the parallel section and transition section of the Al-Zn-Mg-Cu alloy rheological die-casting fracture specimen under different pressure ratios and the change of the equivalent diameter. It can be seen from Figure 13a that the number of holes decreases with the increase of the equivalent diameter as a whole under different boost ratio pressures, and the number of holes is more when the equivalent diameter is less than 0.4 mm Hundreds. When the equivalent diameter exceeds 0.4 mm, the number of holes decreases sharply, all below 50, and the number of holes shows an overall downward trend with the increase of the equivalent diameter. Under the same equivalent hole diameter, the number of holes gradually decreases with the increase of the boost ratio. When the equivalent diameter of the holes is lower than 0.4 mm, increasing the specific pressure of supercharging has a significant effect on reducing the number of holes, and when it is higher than 0.4 mm, the reduction of the number of holes slows down. It can be seen from Fig. 13b that the shape factor of the holes under different pressure ratios decreases with the increase of the equivalent diameter, and the overall shape factor changes very drastically. When the equivalent diameter is higher than 0.6 mm, the shape factors of the pores of the casting specimens pressed with different boost ratios are all lower than 0.5.
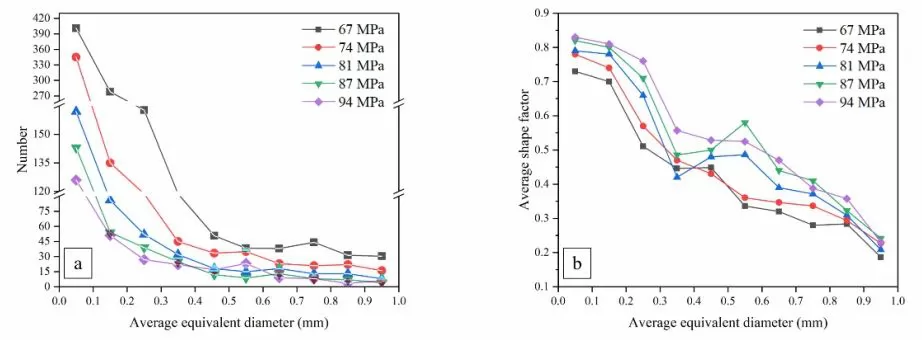
Fig.13 Variation curves of the number of pores, shape factor and equivalent diameter of Al-Zn-Mg-Cu alloy rheological die casting samples under different pressure ratios: (a) number change; (b) shape factor change
Crack source, hole defect is the main influencing factor. In semi-solid rheological die casting, hole is often caused by insufficient solidification feeding. In the initial stage of alloy solidification, the primary grains continue to grow and form a solid phase skeleton that overlaps together. However, under the action of shrinkage in the later stage of solidification, intergranular separation occurs between grains under the action of shrinkage strain (see Figure 14a). In the initial stage of separation, the continuous feeding of liquid metal will not lead to the initiation of cracks, but As the solidification progresses, the solid fraction of the alloy gradually increases and the liquid metal decreases continuously, so that the intergranular separation cannot be fed, thus forming a crack source. This phenomenon is particularly prominent when the supercharging specific pressure is insufficient. The supercharging specific pressure cannot promote the liquid metal to effectively compensate the intergranular, resulting in the existence of loose shrinkage cavities. Intergranular separation due to insufficient feeding usually occurs at the intersection of multiple grains, and part of the remaining liquid alloy between grains will exist in the form of intergranular bridges (Fig. 14b). If a certain stress is applied during the solidification process, the intergranular bridge will be deformed. When the stress exceeds the bonding strength of the intergranular bridge, the bridge structure will be destroyed, and the intergranular separation at the intersection of adjacent grain boundaries will be connected together. Large voids are formed, leading to the formation of cracks and propagation along the grain boundaries, as shown in the fracture tail in Fig. 7a.
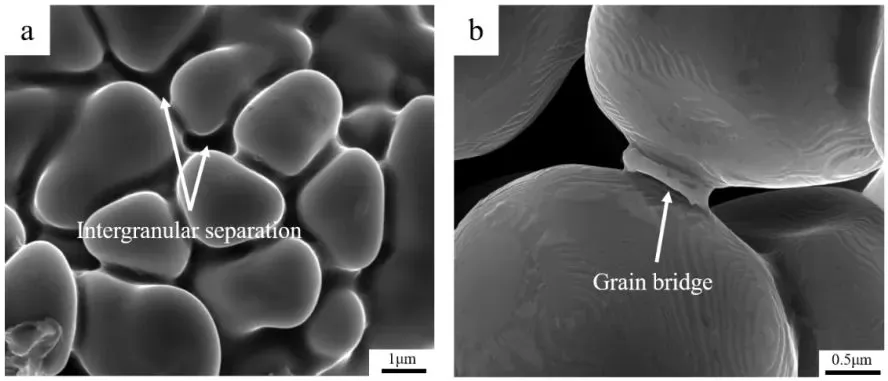
Fig.14 Microstructure of Al-Zn-Mg-Cu alloy casting microstructure at the position of shrinkage cavity
(a) intergranular separation; (b) intergranular bridge
Increasing the boosting specific pressure can effectively compensate for shrinkage at the end of solidification, reduce the generation of hole defects, and improve the overall density of the casting. Continuing to increase the supercharging specific pressure, the effect of reducing the porosity of the casting decreases. When pressurizing, it will give an impact force to the molten metal. When the supercharging ratio is too large, it may cause cracking of the solidifying tissue and aggravate the tendency of hot cracking. The diameter of the parallel section area is smaller, the hole reduces the effective bearing area of stress, and it is more likely to cause thermal cracking to occur in this area. The area close to the gate tends to have a longer solidification time and has a better feeding effect, so there are fewer holes, but at the same time, due to the poor microstructure and properties of the incompletely solidified, excessive booster specific pressure is more likely to cause the area near the gate. The stress exceeds the critical value and cracks, increasing the tendency of hot cracking.
3in conclusion
(1) The hot cracking tendency of Al-Zn-Mg-Cu alloy rheological die castings decreases first and then increases with the increase of supercharging specific pressure. When the supercharging specific pressure is 87 MPa, the casting has the smallest thermal cracking tendency. Crack tendency value of 15.
(2) The internal hole defect of the casting has the most critical influence on the degree of hot cracking tendency, and is the main reason for the formation of cracks. The porosity is mainly due to insufficient feeding. When the supercharging specific pressure is 67-94 MPa, increasing the supercharging specific pressure can effectively reduce the porosity.
(3) The fracture process of hot cracking of Al-Zn-Mg-Cu alloy castings mainly has three stages: Stage I is the central brittle fracture; Stage II is the transition stage of brittle-ductile combination; Stage III is the edge ductile fracture of the sample.


.png)


.png) +86-574-83036520
+86-574-83036520 +86-574-83008051
 sales@innovaw.com

.png)

.png)
.png)
.png)

.png)
.png)
.png)





.png)

