Summary:
The microstructure and mechanical properties of the vacuum die-casting magnesium alloy shock tower were analyzed by OM, SEM and EDS. The casting simulation software EKKCapcast was used to simulate the filling process of die-casting, and the porosity in different positions of the shock tower was compared, and then the reasons for the entrainment of the casting were analyzed. The tensile test results show that when the high and low speed switching position of the punch changes between 560 and 600 mm, it has little effect on the mechanical properties of the shock tower. The reasons for the lower performance; and the simulations effectively predict where the entrainment may occur and the severity of entrainment.
In recent years, with the rapid development of new energy vehicles, vehicle lightweighting has received increasing attention in the automotive industry. In order to control vehicle weight, reduce energy consumption and reduce exhaust pollution, more and more new materials are being used in the automotive industry. Magnesium alloy is the lightest metal structural material, about 35% lighter than aluminum alloy, about 78% lighter than steel, and also has the characteristics of good dimensional stability, high specific strength/specific stiffness, and easy processing.
Al and RE are the main alloying elements in AE44 magnesium alloy. As the most commonly used alloying element in magnesium alloys, Al can improve its strength and castability. The atomic bonding force between RE and Al is greater than that of Mg and RE, so the Al11RE3 phase with high thermal stability will be preferentially combined, thereby reducing the Mg17Al12 phase with poor thermal stability, which is beneficial to the high temperature performance of magnesium alloys. The RE element can also improve the morphology of the Mg17Al12 phase and refine the grains, thereby improving the room temperature mechanical properties of the alloy. Moreover, due to the improved morphology and reduced content of the Mg17Al12 phase, the microcurrent density between the phase and the magnesium matrix is reduced, which reduces microcurrent corrosion and improves the corrosion resistance of the alloy.
High pressure die casting is a low-cost, high-efficiency production process that can manufacture complex parts, and is also one of the most commonly used manufacturing processes for light alloys such as magnesium and aluminum alloys. The molten metal is injected into the cavity at high speed and solidified under high pressure, so that castings with high dimensional accuracy and fine grains can be obtained, which are especially suitable for the forming of thin-walled and complex parts. However, during the filling process, the molten metal rushes into the mold cavity at a high speed in a turbulent state, the gate speed can reach 70 m/s, and the filling time is only 0.1~0.2 s. The extremely fast filling speed and extremely short filling time make it difficult to completely discharge the gas in the cavity, and even in the high vacuum state, air holes are inevitable. Under the conventional heat treatment process, the thermal expansion of the pores in the casting causes bubbling on the surface of the casting, resulting in deformation of the casting. The existence of pores will also significantly reduce the mechanical properties of the casting, affecting the air tightness and pressure resistance of the casting. Through computer simulation, researchers can obtain the distribution of defects in the casting and analyze the reasons for the formation of defects.
This topic analyzes the microstructure and morphology of AE44 magnesium alloy, studies the influence of the high and low speed switching position of the punch on the mechanical properties of the shock tower, and analyzes the reasons for the difference in mechanical properties by observing the fracture morphology and simulating the filling process.
1experiment method
The outline dimension of the shock tower is 571 mm × 210 mm × 352 mm, the mass of the finished product is about 3.6 kg, the volume is 2.14 × 106 mm3, the wall thickness of the near gate area is about 3 mm, and the wall thickness of the far gate area is about 2.5 mm , see Figure 1 for a schematic diagram of the structure. It can be seen that the shock tower is in the shape of a funnel as a whole, and the reinforcing ribs are crisscrossed. This product is a typical complex thin-walled casting. In order to meet the performance requirements of the parts, it is produced by vacuum die casting process. The alloy is AE44 magnesium alloy, and the alloy composition obtained by ICP (model: Perkin Elmer, Plasma 400) is shown in Table 1.

Table 1 Chemical composition of AE44 magnesium alloy %

(a) The front side of the shock tower (b) The reverse side of the shock tower
Figure 1 Schematic diagram of the structure of the shock tower
LK DCC2500 die-casting machine was used, and the process parameters are shown in Table 2. Among them, the 1st speed and the 2nd speed belong to the low speed stage, the 3rd speed belongs to the high speed stage, and the starting point of the 3rd speed is the position of the high and low speed switching of the punch. In this experiment, three high and low speed switching positions were set, which were 560 mm, 580 mm and 600 mm, respectively. The corresponding castings were prepared and the die-casting process was simulated. The simulation uses EKKCapcast software. Considering the calculation accuracy and solution efficiency, dense mesh is used for division. The total number of meshes of shock tower and pressure chamber is 2 310 053.

Table 2 Die-casting process parameters of shock tower
In order to study the mechanical properties of the shock tower, samples were taken from the casting body by wire cutting, and the Zwick Z100 universal material testing machine was used for tensile testing at a tensile rate of 0.5 mm/min. The metallographic samples were taken from the No. 1 sample with the high and low speed switching position of 580 mm. The microstructure of the sample was observed by LEICA MEF4M optical microscope and Phenom Pro scanning electron microscope, and the tensile specimen was observed in the secondary electron mode. Fracture shape.
2Trial Results and Discussion
2.1 Microstructure
Figure 2 is a photo of a typical microstructure in the thickness direction of a die-cast magnesium alloy, with large pre-crystallized structures, fine and round α-Mg grains, defect zones, and eutectic structures. From the edge to the center of the specimen, it is mainly divided into 3 typical regions: the fine-grained layer, the defect zone and the central region.
The fine grain layer is a layer of primary α-Mg and eutectic structure on the outer side of the die casting, which is characterized by small grains and dense structure. When the molten metal is filled into the cavity, the molten metal encounters the inner wall of the cooler cavity, resulting in a strong chilling effect, and a large amount of α-Mg rapidly nucleates and grows to contact with each other, forming a small and disordered equiaxed crystal region. . Because part of the molten metal in the central area feeds the first solidified area, the surface structure is dense and basically free of hole defects. The fine-grained layer is shown to the left of the red dashed line in Figure 2b. The fine-grained layer can improve the strength, elongation and corrosion resistance of castings.
The defect zone is a unique structure of cold chamber die casting, and its existence is not conducive to the mechanical properties of die castings. Usually, two or four strip-shaped solute-enriched regions in a parallel relationship can be observed on the cross-section in the thickness direction of the casting. Expansion shear theory to explain the formation mechanism of defect bands. But so far, researchers have not been able to provide a systematic explanation for the different morphological defect bands. The eutectic fraction of defect bands is usually high relative to other regions. From Figure 2a, it can be observed that there are 2 defect bands distributed on both sides of the sample, but they are not obvious, which may be related to the low speed at low speed.
There are two α-Mg morphologies in the central area, one is small and round, and the other is large dendrite. Due to the relatively low temperature and small surface roughness of the pressure chamber wall relative to the molten metal, a large amount of heat is dissipated after the molten metal contacts the colder pressure chamber wall. Nucleation growth. These pre-nucleated grains are injected into the cavity in the subsequent fast injection stage, and move towards the core of the casting under the action of the fluid. Due to the long growth time, these grains finally grow into larger pre-crystallized structures, as shown in Figure 2a and Figure 2c. Most of the pre-crystallized structures were broken by the fluid shear force during the filling process (in the box), and only a few showed complete macrodendritic morphology (in the circle). On the other hand, due to the holding pressure, the solidified shell layer is closely attached to the surface of the cavity, which enhances the heat transfer capacity between the two. Therefore, under the conditions of faster cooling rate and larger subcooling Rapid nucleation, solidification is over before growth and dendrite arms grow, so the grains exhibit a fine and rounded morphology, see Figure 2c.
Figure 2d is a scanning electron microscope photo of the central area of the sample. It can be seen that the alloy structure is composed of α-Mg matrix (black part) and a large number of precipitates (bright part), the precipitates are mainly distributed between grain boundaries, and a few are distributed inside the grains. Through EDS analysis and related research, it can be seen that the lamellar white eutectic structure is Al11RE3, and the bright white bulk phase is Al2RE. This is because the electronegativity difference between RE and Al is larger, and the Al-RE phase is easier to form. The remaining Al is solid-dissolved in the Mg matrix due to the rapid cooling rate and has no time to precipitate, so no obvious Mg17Al12 phase is observed.
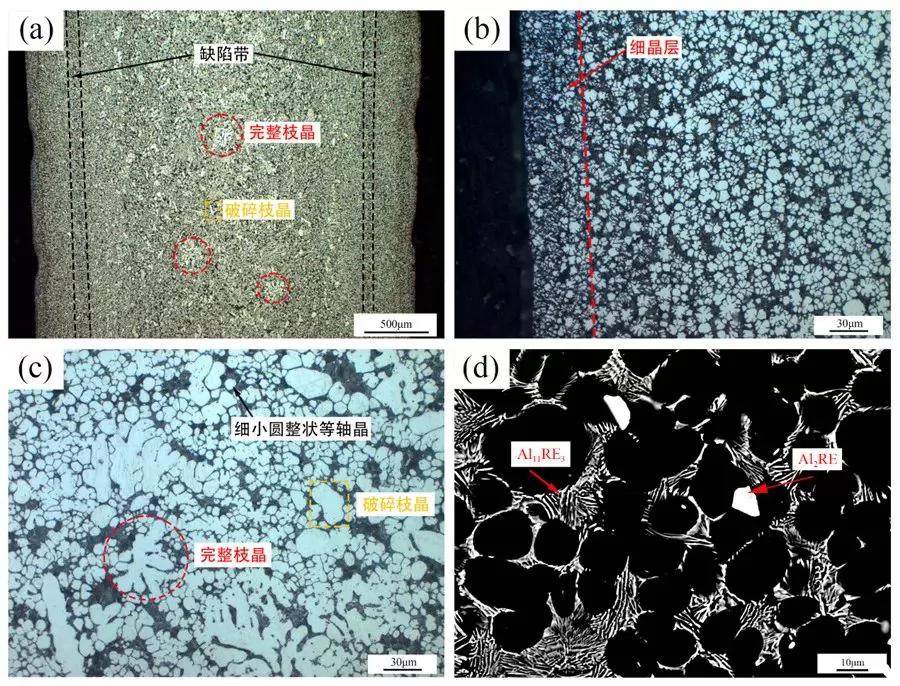
(a) Overall cross-section, (b) fine-grained layer, (c) central region, (d) SEM morphology of central region
Fig.2 Microstructure of the specimen in the thickness direction
2.2 Mechanical properties
In order to study the influence of high and low speed switching position on the mechanical properties of the shock tower, different castings were sampled on the body. The size of the stretched sheet obtained by cutting is 54.5 mm × 15 mm, and the thickness is related to the sampling position. Among them, the thickness of samples 1 to 4 is 3 mm, and the thickness of other samples is 2.5 mm.
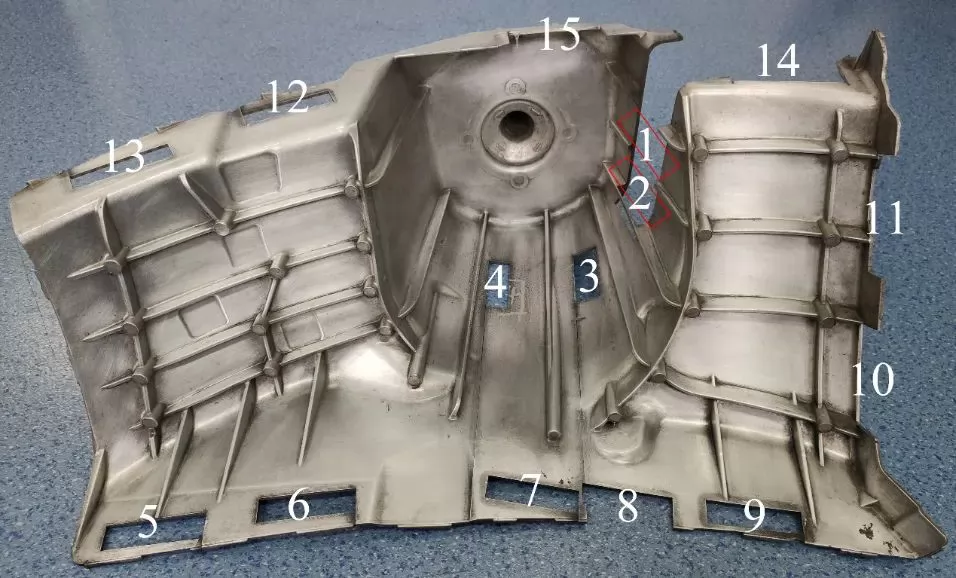
Figure 3 Sampling position of the shock tower body
Figure 4 shows the mechanical properties of the shock tower under three different process parameters. It can be found that the mechanical properties of the shock tower under different processes have little difference, the average yield strength difference is only 1 MPa, while the average tensile strength and elongation vary with The delay of switching positions between high and low speeds decreased slightly. The average tensile strength is between 215 and 232 MPa, and the average elongation is about 8.4%, and the fluctuation is small. From the tensile results of the samples, it can be seen that the high and low speed switching position has little effect on the mechanical properties. This is because the high and low speed switching position will change the flow pattern of the molten metal in the pressure chamber, which will affect the entrainment during the filling process, and ultimately affect the mechanical properties of the casting. But in this test, the high and low speed switching positions are 560, 580 and 600 mm respectively, and the maximum difference is only 40 mm. Relative to the length of the pressure chamber (900 mm), the position change is small, so it has little effect on the flow pattern of the molten metal in the pressure chamber. And because the vacuum degree is high in the die casting process, the gas content in the pressure chamber is very low. Therefore, when the high and low speed switching position changes between 560 and 600 mm, it has little effect on the mechanical properties of the shock tower.
According to the distance from the sample to the gate, the sample is divided into 3 regions, No. 1~4 are samples in the near gate area (region I), and samples No. 5~11 are samples in the far gate area (region II) ), and samples No. 12 to 15 are samples in the middle region (region III). It can be seen that there are obvious differences in the average tensile strength and elongation of the three regions, but the average yield strength of the different regions is still very close. This is because casting defects have little effect on the yield strength in the elastic phase [28], so the average yield strength of each region varies relatively little. In the casting with the high and low speed switching position of 580 mm, the average elongation of the samples in regions I, II and III were 10.8%, 6.5% and 9.5%, respectively, and the average tensile strengths were 231, 211 and 239 MPa, respectively, that is, the distance The farther from the gate, the lower the average tensile strength and elongation of the specimen. For die castings, void defects due to entrainment and solidification shrinkage are inevitable. There are two main effects of holes on the mechanical properties, one is to reduce the effective stress area of the sample, and the other is to cause local stress concentration of the sample. Comparing the average mechanical properties of the different regions, it is found that the elongation fluctuates more than the tensile strength and yield strength because it is more susceptible to voids.
According to the above analysis, when the high and low speed switching position changes between 560 and 600 mm, it has little effect on the mechanical properties of the shock tower. Therefore, the shock tower whose high and low speed switching position is 580 mm is selected to simulate its filling process. The results show that the distribution of the pressure and temperature fields around the shock tower is basically the same, and it is speculated that the difference in elongation is mainly due to the difference in the degree of air entrainment at each position of the shock tower.
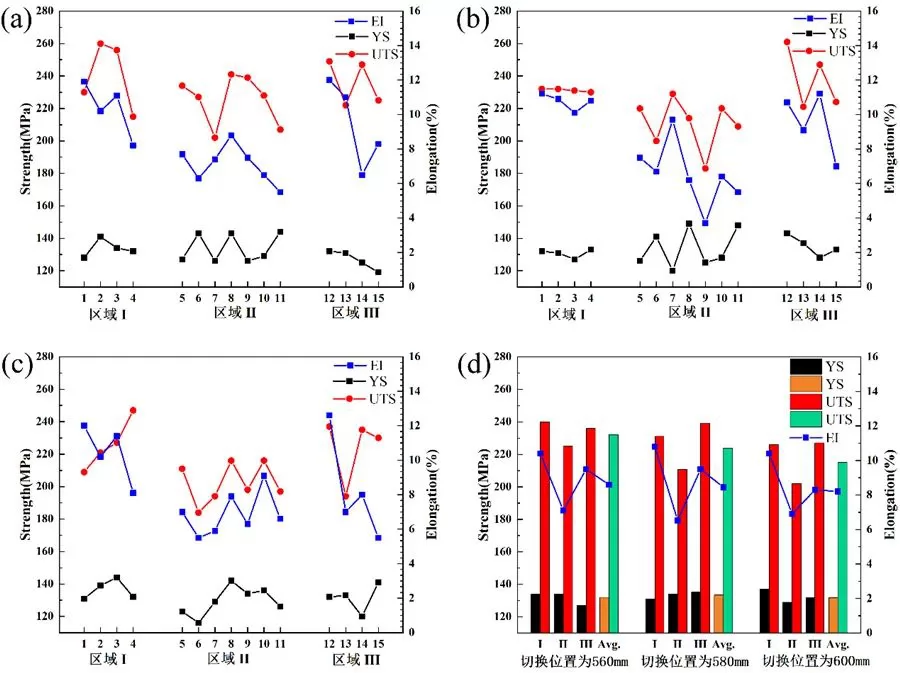
Fig. 4 (a) Mechanical properties of shock tower with high and low speed switching position of 560 mm; (b) Mechanical properties of shock tower with high and low speed switching position of 580 mm; (c) High and low speed switching position of 600 mm shock tower Mechanical properties; (d) Average mechanical properties of each area and the whole of the shock tower
2.3 Simulation analysis of casting defects
Figure 5 shows the roll-up distribution of the shock tower with a high and low speed switching position of 580 mm under different viewing angles. It can be seen that, because the area I is closest to the gate, even if there is metal liquid with a large amount of entrained air in this area when it is just filled, it is quickly replaced by the molten metal with less entrained air, which makes the volume of the sample in area I. The air volume is the least, the mechanical properties are the best, and the average elongation rate reaches 10.4%.
The upper part of the samples No. 5 and No. 9 in area II had serious air entrainment, and the highest entrained air volume reached 3.5 mL/100g. The simulation of the filling process shows that the molten metal is filled in the direction of the black arrow, which is almost in a vertical relationship with the protruding stiffener above the sample. volume, at this time it is very likely that entrainment will occur. When the entrained metal liquid is in the protruding reinforcing rib, compared with other positions of the cavity, the entrained metal liquid is difficult to be pushed forward by the subsequent molten metal, and it is easy to stay in the reinforcing rib. After the casting is filled, only a small part of the entrained metal liquid in the reinforcing rib above the sample No. 9 is pushed forward by the subsequent liquid metal, that is, the entrained metal liquid flowing out of this small part makes the No. 9 sample. The air entrainment is more serious at the location where the air is entrained; most of the remaining gas entrained metal liquid is still trapped in the reinforcing rib, resulting in serious air entrainment at the reinforcing rib.
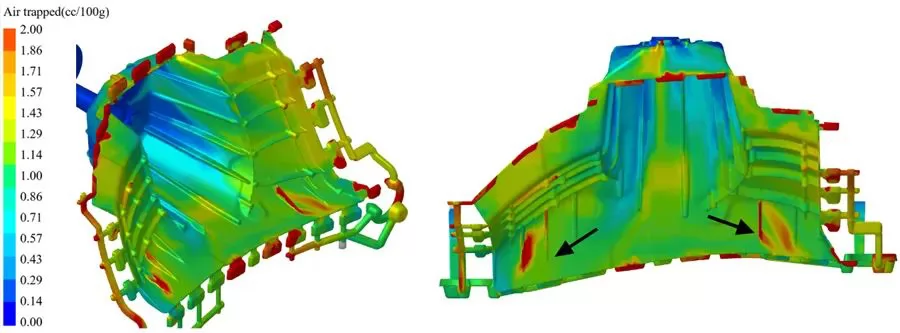
Figure 5. Air entrainment distribution at different viewing angles of the shock tower with high and low speed switching position of 580 mm
6 is the flow pattern of the molten metal in the pressure chamber when the filling time is 0.9486 s and 0.9511 s. After switching from low speed to high speed, the flow rate of the molten metal above the pressure chamber is accelerated, filling the cavity first and sealing the gate. The molten metal below is relatively lagging behind, forming a large entrapment with the pressure chamber wall, resulting in the failure of part of the gas in the pressure chamber to be discharged smoothly, which greatly increases the amount of entrained gas in the molten metal. Figure 6c shows the air entrainment distribution when the molten metal first enters the cavity. It can be seen that the molten metal with serious entrainment in the upper right corner of the gate will be filled in the direction of the No. 10 and No. 11 samples. Even though the overflow tank has contained most of the entrained metal liquid, some entrained metal liquid still stays around the overflow tank, which makes the gas entrainment at the No. 10 and No. 11 sample positions more serious.

Figure 6 (a), (b) The flow pattern of the molten metal in the pressure chamber, (c) The distribution of the entrained gas when the molten metal just fills the cavity
There was slight entrainment at the location of sample No. 13 and No. 14 in Zone III. Combined with the simulation results of the molten metal filling, it can be seen that the entrained air at the No. 13 sample position changes little during the filling process of the molten metal. When the entrained metal liquid produced by wrapping in the press chamber flows in the direction of sample No. 13, most of the entrained metal liquid flows into the overflow tank, which indicates that the overflow tank plays a good role in draining the overflow. The reason for the slight entrainment of sample No. 14 is the same as that of samples No. 10 and No. 11 in Zone II.
2.4 Fracture morphology
A representative sample was selected in each of the three regions, and the fracture morphology of the sample was observed. Figure 7 shows the fracture morphologies of sample No. 1 in region I, sample No. 9 in region II and sample No. 13 in region III. Small and shallow dimples can be observed in all three fracture morphologies, accompanied by a large number of microscopic tearing edges, which are typical ductile-brittle mixed fractures. It can be seen from Fig. 7a that the fracture of sample No. 1 is the flattest, with a small amount of pores (marked by the yellow dotted line), and no other obvious casting defects are observed. The pores are small in size, with a maximum diameter of no more than 30 μm. It may be that after the molten metal hits the rib-shaped wall, the pressure of its reverse rewinding squeezes and breaks some macroscopic air masses, forming relatively dispersed microscopic air masses. Figure 7b shows the fracture morphology of sample No. 9. It can be seen that the fracture height difference is large, and there are large-sized pores with a diameter of about 200 μm, accompanied by many small-sized pores. In addition, there are almost no dimples on the fracture surface, and a cleavage step (marked by a box) characteristic of brittle fracture is found, which results in an elongation of only 3.7% for sample No. 9. Figure 7c shows the fracture morphology of sample No. 13, which is basically the same as that of sample No. 1 shown in Figure 7a, with only a few small-sized pores added.

Fig.7 Fracture morphologies of typical samples in each region (a) Sample No. 1 in Region I, (b) Sample No. 9 in Region II, (c) Sample No. 13 in Region III
3 Conclusions
(1) The microstructure of the die-casting magnesium alloy shock tower is divided into 3 regions along the thickness direction, and the fine-grained layer is composed of fine α-Mg and eutectic structure; the defect bands are distributed on both sides of the sample, compared with other regions, the defect band The volume fraction of the internal eutectic structure is high; the α-Mg in the central region mainly has two morphologies: fine equiaxed crystals and large dendrites. The large dendrites are formed in the pressure chamber and mainly distributed in the central region.
(2) The high and low speed switching position has little effect on the mechanical properties of the shock tower. Under different processes, the difference between the average yield strength of the shock tower is only 1 MPa; the minimum average tensile strength is 215 MPa, the maximum is 232 MPa, and the fluctuation is small; the elongation is about 8.4%, and the highest elongation The difference between the maximum elongation and the minimum elongation is only 0.4%.
(3) The filling process of the shock tower is simulated, and the reasons for the air entrainment of the samples at different positions are explained. The fracture morphologies of typical specimens in each region were observed. Except for pores, no other obvious casting defects were found. Therefore, pores are the main reason for the difference in mechanical properties of the samples.


.png)


.png) +86-574-83036520
+86-574-83036520 +86-574-83008051
 sales@innovaw.com

.png)

.png)
.png)
.png)

.png)
.png)
.png)





.png)

