Abstract|From the aspects of die casting mold structure, mold flow analysis, production process control, etc., the prevention methods for leakage caused by common defects (shrinkage cavities and surface strain) of die castings are introduced in detail. Practice shows that the leakage risk of die-casting aluminum parts is effectively reduced by this method, and the internal quality of die-casting aluminum parts is improved.
The application of die-casting aluminum parts in automobile engines is more and more extensive, such as: cylinder block, cover, oil pan, etc., but there are also many problems, one of which is leakage. Typically, the foundry will rough-machine the blank, then use compressed air to perform a 100% leak test on the part (the common method is the differential pressure method or the volume flow method), and send the qualified parts to the OEM. The main engine factory performs precision machining, and the casting defects of the die-casting parts will be exposed on the machined surface. Many appearance defects are screened by visual inspection, but the parts will still be screened by a 100% leak test. Different channels (oil channel, cooling water channel, etc.) are also 100% leak tested during engine assembly. Finally, various leaks will still occur in the engine function test, the vehicle function test and even the user's use process. The reason is that many minor leaks cannot be detected during the cold leak test of the parts and the engine. However, during the actual operation of the engine, due to The oil temperature can reach 120°C and the problem will be exposed. It brings greater quality risks to die casting manufacturers and OEMs. Therefore, how to reduce or avoid this quality problem has become the research topic of researchers.
1 Confirmation of the cause of leakage
For leakage, technicians use various tools to confirm the cause, from simple visual inspection, and use professional water testing equipment to confirm the leak point, carry out CT inspection or color development flaw detection on the parts to confirm the leakage channel, and finally slice for metallography analyze. At present, the main reason for leakage is that there is shrinkage porosity inside the casting, and the size of the shrinkage porosity varies from tens of μm to several mm. At the same time, there are strains and sticking on the surface of the casting. The combination of the two forms a channel that expands further when the oil or coolant temperature is high, resulting in oil or coolant leakage, see Figure 1.
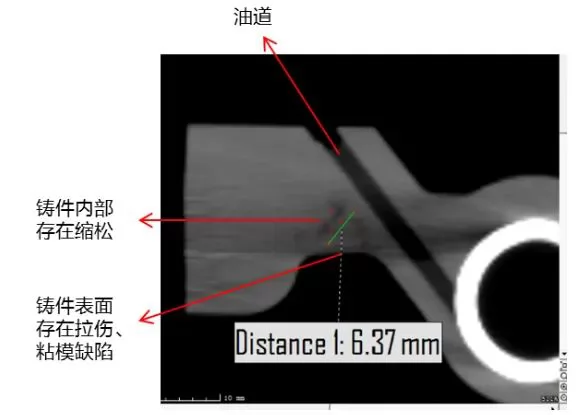
Figure 1: Oil leakage occurred in an aluminum die casting during the engine test (visually found surface strain, CT scan found internal shrinkage)
2 Shrinkage cavity (shrinkage porosity) and strain (stick mold) prevention
Summarized the leakage analysis and solutions of die castings for many years, from the aspects of mold/product structure, mold flow analysis, process parameter formulation, process control and product inspection, etc. effective prevention of leakage problems.
2.1 Analysis of mold temperature and mold flow
A certain cylinder head cover had several minor oil leaks during the engine test. The location of the oil leakage was not fixed, but they were all close to the side of the gate. At the same time, the surface appeared sticky mold and strain. In the actual production process, it was found that cracks, surface sticking and straining began to appear near the gate of the new mold less than 10,000 molds. No abnormality was found in the inspection of mold material, surface treatment and mold temperature. When the mold flow analysis was performed again, it was found that under the existing mold design, the cross-sectional area of the gate was small, and the mold was seriously washed by the molten aluminum. In this regard, the mold is redesigned, the gate is optimized, and the single-sided runner is changed to a double-sided runner (see Figure 2), thereby increasing the cross-section of the gate and reducing the erosion of the mold by the molten aluminum. Fundamentally solved the problem.
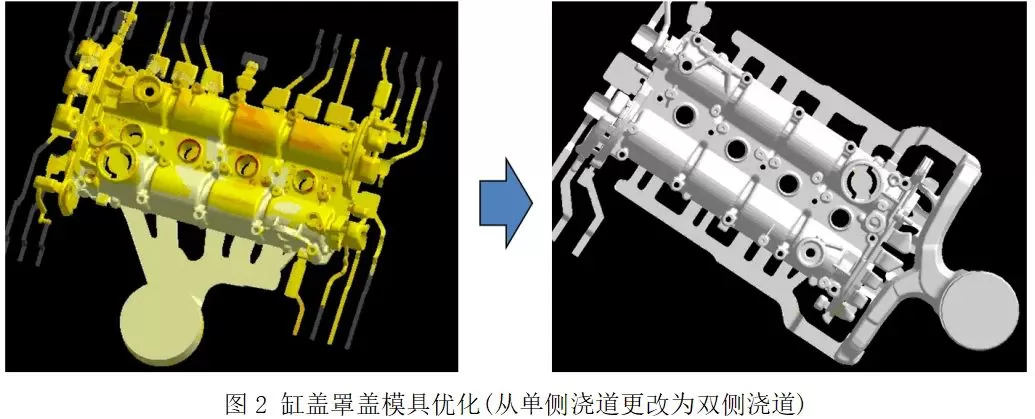
Figure 2: Cylinder head cover mold optimization (change from single-sided runner to double-sided runner)
When designing a mold, it is usually necessary to use professional software to analyze the mold flow and mold temperature of the mold to identify whether there is air entrainment during the filling process of the molten aluminum, whether the cross-sectional area of the gate is reasonable, and the final cooling position of the part forming process, so as to be reasonable. Design the process and properly optimize the mold structure. Therefore, attention should be paid to the simulation analysis: first, the consistency of the mold and the entity, and at the same time, the cooling channels, pouring risers, etc. inside the mold need to be fully considered. Second, the mesh division affects the accuracy of the simulation analysis. The type and number of meshes need to be considered when meshing, and the mesh changes with the distribution of the wall thickness of the part. Third, the accuracy of the material data of the molten aluminum needs to consider the thermal expansion coefficient, shrinkage rate, viscosity, etc. of the material when setting the material properties. Fourth, the process parameter settings also need to be consistent with the actual situation, such as mold temperature, aluminum liquid filling temperature, pressure holding curve, filling control method, die casting parameters, etc.
2.2 Mold/Product Structure Optimization
After processing a cylinder block, it is found that there are large shrinkage holes in the bolt holes near the water channel (see Figure 3). At the same time, when the product is 100% leak tested, the leakage rate of the water channel is relatively high. Appearance inspection and CT scan of the defective products found that there were slight strains on the inner wall of the water channel and internal shrinkage holes penetrated, resulting in leakage. Analysis of the product found that the wall thickness at this position is large, and shrinkage holes are easily formed inside. Since this position needs to be machined, the core can be added to the mold to form a pre-cast hole, thereby reducing the wall thickness, which is conducive to the cooling of the casting. Shrinkage cavities and pre-cast hole surface strain are eliminated.
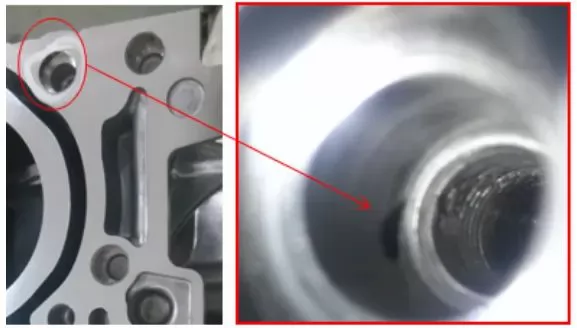
Figure 3: After processing, it is found that there are large shrinkage holes in the holes, and the shrinkage holes are effectively solved after adding pre-cast holes
The product design and subsequent mold design cannot be perfect, and the actual casting process cannot be simulated due to the limitation of boundary condition settings. Therefore, many defects are difficult to be completely prevented during product design, and the problem is often in the mass production process. exposed. However, the product or mold can be properly optimized without affecting the structure and function of the final product.
Adding pre-casting holes is a more common solution to solve shrinkage holes, but when adding pre-casting holes, it is necessary to focus on the diameter, depth and position of the holes, and control of the draft angle. Once the core is deformed, it must be replaced, and at the same time The core is surface treated to increase core strength.
For mold sticking and strain, it is mainly concentrated on some protrusions with high mold temperature (corresponding parts are grooves), positions with small draft angle and areas where the molten aluminum is directly scoured. When the mold is opened, the mold pulls the surface of the part. Therefore, on the premise of not affecting the wall thickness, the rounded corners of the convex position of the mold can be appropriately increased, and the draft angle can be appropriately increased, or the surface of the mold can be coated to make the release agent more adhered to the surface of the mold. Mold surface to reduce the risk of strain and mold sticking.
2.3 Process plan formulation
A certain cylinder block had oil leakage during the engine test, and the leakage point was the threaded hole close to the oil passage. CT scanning of the defective parts showed that there was shrinkage at the bottom of the threaded hole, as shown in Figure 4. The pre-cast hole has been added to this position, but the mold temperature is measured and the temperature is still high. Finally, high-pressure spot cooling was added, the mold temperature was controlled, and the shrinkage cavity problem was significantly improved, as shown in Figure 5.
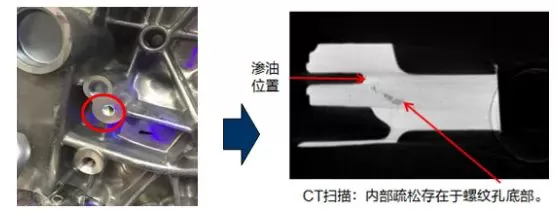
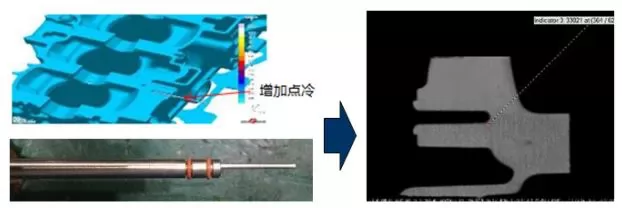
Figure 5: With the addition of high-pressure spot cooling, shrinkage cavities are significantly improved
100% product leakage test was carried out after a certain cylinder block was processed, and it was found that the product leakage test rate was high. After statistical analysis of the defective products, it was found that 95% of the products were unqualified for the high-pressure oil passage test. CT scan found that there were many shrinkage porosity at the bottom of the threaded hole of the main bearing seat near the high-pressure oil passage, and the leakage test rate was not significantly improved after adding the pre-cast hole. Subsequently, a local extrusion process was added to the main shaft hole (see Figure 6) to make the position more dense, thereby reducing shrinkage cavities and shrinkage porosity. After verification, the leakage test rate was reduced from 4% to 0.2%, and the effect was obvious.
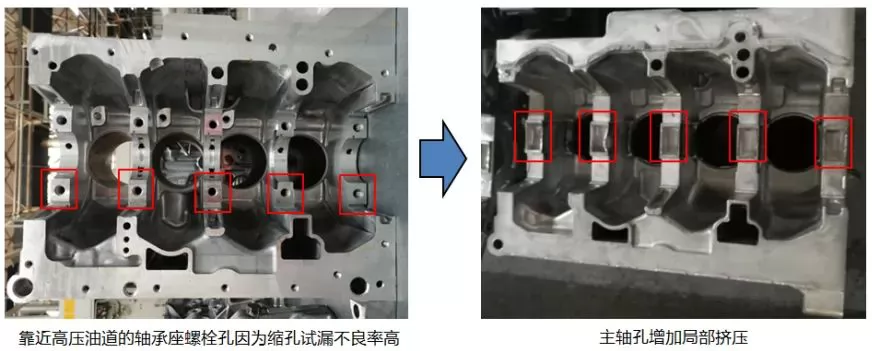
Figure 6 Using local extrusion, the leak test rate at this location is significantly improved
A good process plan also has a great effect on reducing the shrinkage cavity ratio and reducing the mold sticking and strain on the casting surface. Sometimes the problem of internal shrinkage may not be solved by simply adding pre-cast holes. In this case, it is necessary to use a little cooling, that is, to increase the cooling circulation channel inside the mold or core. Spot cooling is divided into ordinary spot cooling and high-pressure spot cooling. The selection of the two still needs to be determined by the mold temperature. If the mold temperature is high, the high-pressure spot cooling can quickly take away the heat. This process scheme is very practical and also Many die-casting plants have successfully applied it. At the same time, it is necessary to check and replace the core regularly to avoid other quality problems such as core deformation and water leakage.
At present, the local extrusion process is more and more widely used in the key positions of die castings. The local extrusion makes the internal casting quality more dense, so the proportion of shrinkage cavities and shrinkage porosity is lower. In the local extrusion process, it is important to control the starting time of extrusion, the spraying of extrusion pins (to avoid pinching of extrusion pins), and the depth of extrusion should also be monitored.
In addition to the above solutions, mold surface treatment, cooling water type, spraying method, spraying time, spraying angle, spraying distance and spraying path need to be considered. For example, cooling water, for some castings with higher requirements, many die-casting plants use pure water for cooling to avoid scaling in the cooling channel, thereby reducing the cooling flow and causing the mold temperature to fail to meet the requirements. For the process settings of spraying, profile spraying is now more and more used, and regular calibration of the nozzle position is also necessary. In general, the formulation of process parameters has a great impact on the quality of die castings, which needs to be verified through a large number of tests and experiences, and is also a continuous optimization process.
2.4 Process Control
The main purpose of process control is to ensure that the relevant parameters are stably implemented under the provisions of the established process plan. The monitoring of mold temperature is particularly important. Currently, thermocouples can be used to monitor mold temperature in real time. However, since it cannot cover all locations, it is necessary to use a thermal imager or a temperature measuring gun to measure mold temperature regularly. In addition to the use of thermal imagers for specific problem analysis, it is very important to carry out continuous temperature measurement during the formulation of mold temperature parameters (see Figure 7).
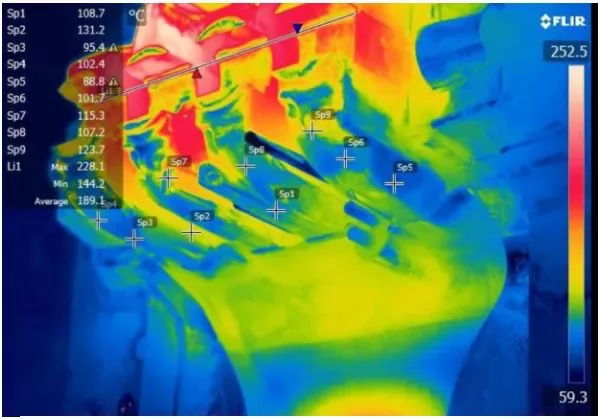
Figure 7: Thermal imaging camera analyzes and controls mold temperature
There are many parameters that affect the mold temperature. In addition to directly monitoring the mold temperature, it is very important to regularly monitor the cooling water flow, whether the release agent nozzle is blocked, and whether the inserts are regularly cleaned and replaced as required.
2.5 Product Inspection
In the actual production process, parts may leak due to various reasons, so regular inspection of parts is necessary. Regular X-ray and CT scans can be performed for the internal shrinkage of the die-casting; for the surface scratches of the parts, the casting workers can inspect them visually. Once the surface scratches and sticking are found, they need to stop the machine to confirm the cause and avoid batch quality problems. At the same time, it is necessary to trace the parts. Figure 8 is for the control plan after the surface of the parts is found to be damaged; in addition, for the local extrusion process, it is necessary to regularly measure the extrusion depth of the parts to monitor the effectiveness of the local extrusion. . A common defect is insufficient local extrusion depth, which is often caused by the jamming of the extrusion pin. When product leakage occurs, and when the leakage test rate is high, the product can be impregnated. The parts that fail the leak test and the leakage value is within a certain range are impregnated with 100%, and the pass rate of the secondary leak test is over 95%. . But the impregnation cost is relatively high. Figure 9 summarizes the key control points. Using this solution, we have combed all the die-casting aluminum parts of the engine involving oil passages and coolant passages (see Figure 10) together with die-casting parts manufacturers, and achieved very good results.
3 Conclusion
From the whole process of die-casting production, it summarizes how to avoid internal shrinkage and surface strain of die-casting parts. Taking an aluminum die-casting cylinder block as an example, after using this scheme for carding, the failure rate of leak test after rough machining in the foundry is reduced to 0.3%, and the failure rate of leak test after finishing in the main engine factory is reduced to 0.2%. And after-sales complaints have been 0 leaks for 2 consecutive years.


.png)


.png) +86-574-83036520
+86-574-83036520 +86-574-83008051
 sales@innovaw.com

.png)

.png)
.png)
.png)

.png)
.png)
.png)




.png)

